


Approval workflows
Define who approves a record and in which order, then choose which workflow each area uses for the whole company or for one project.
- Where to find it
- Company settings > General > Approval Workflows
- Who can use it
- People who have the View Approval Workflows permission. Creating and configuring need Add and Edit. Deleting a workflow needs Delete.
An approval workflow is a list of approvers. When someone submits a record, for example a purchase order (PO), it goes to the first approver. After that approver says yes, it goes to the next one. The record is approved when the last approver says yes.
You do two things on these screens. First you create the workflows. Then you tell Superwise which workflow each area uses. An area is a part of Superwise, such as Purchase Orders or RA Bills. You can set one workflow for the whole company and a different one for a single project.
Before you start
- Create the roles and users who will approve. See Roles and Users. A workflow can name a role or a user.
- A locked user cannot be part of a workflow. See Users.
How to create a workflow
- Open Company settings in the left menu, then General, then Approval Workflows.
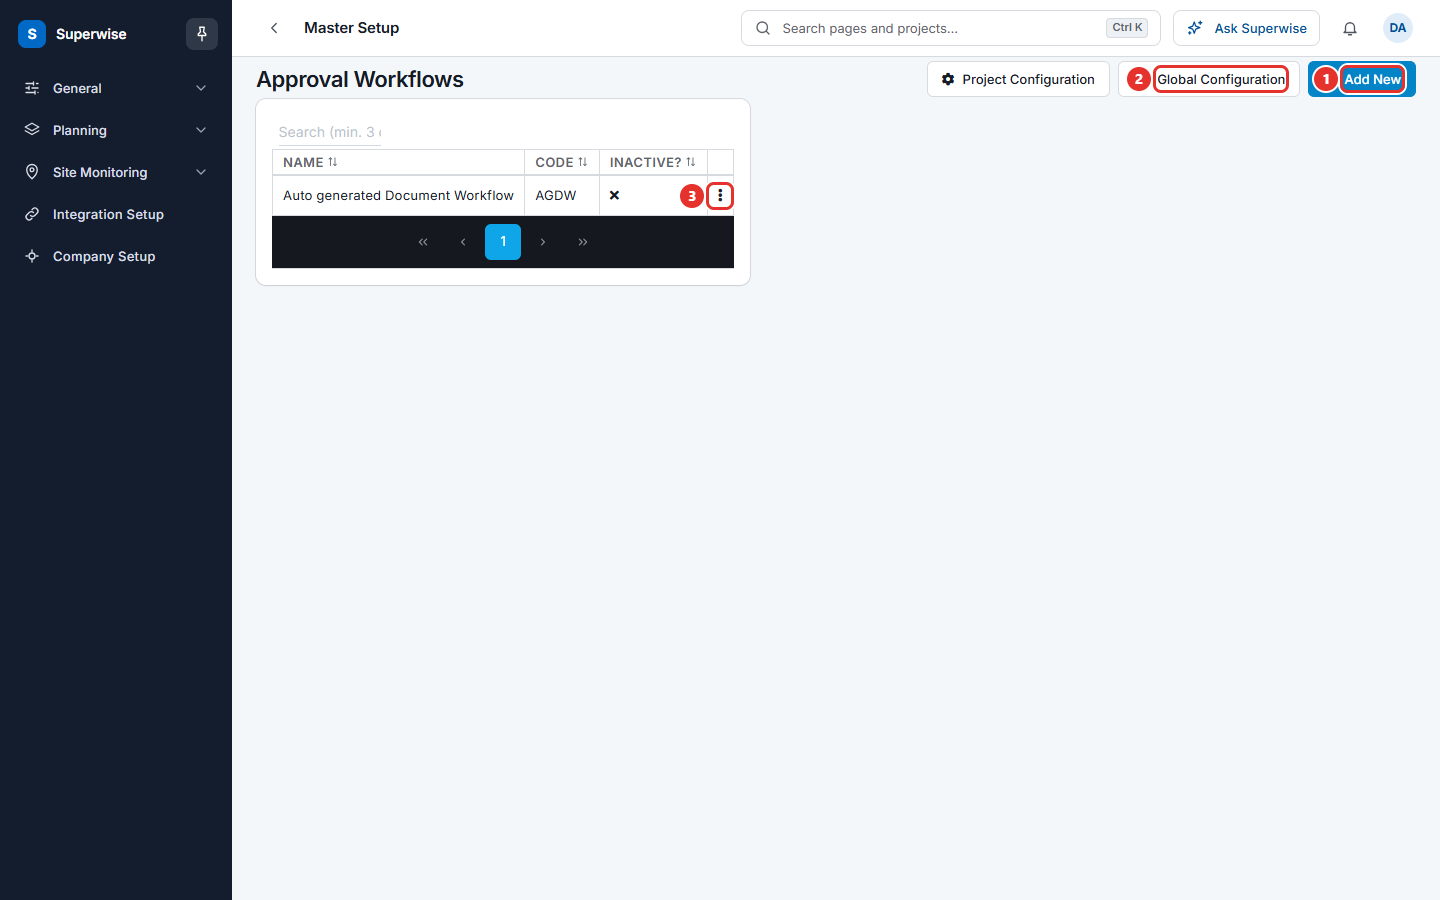
- Click Add New (mark 1 in the first picture).
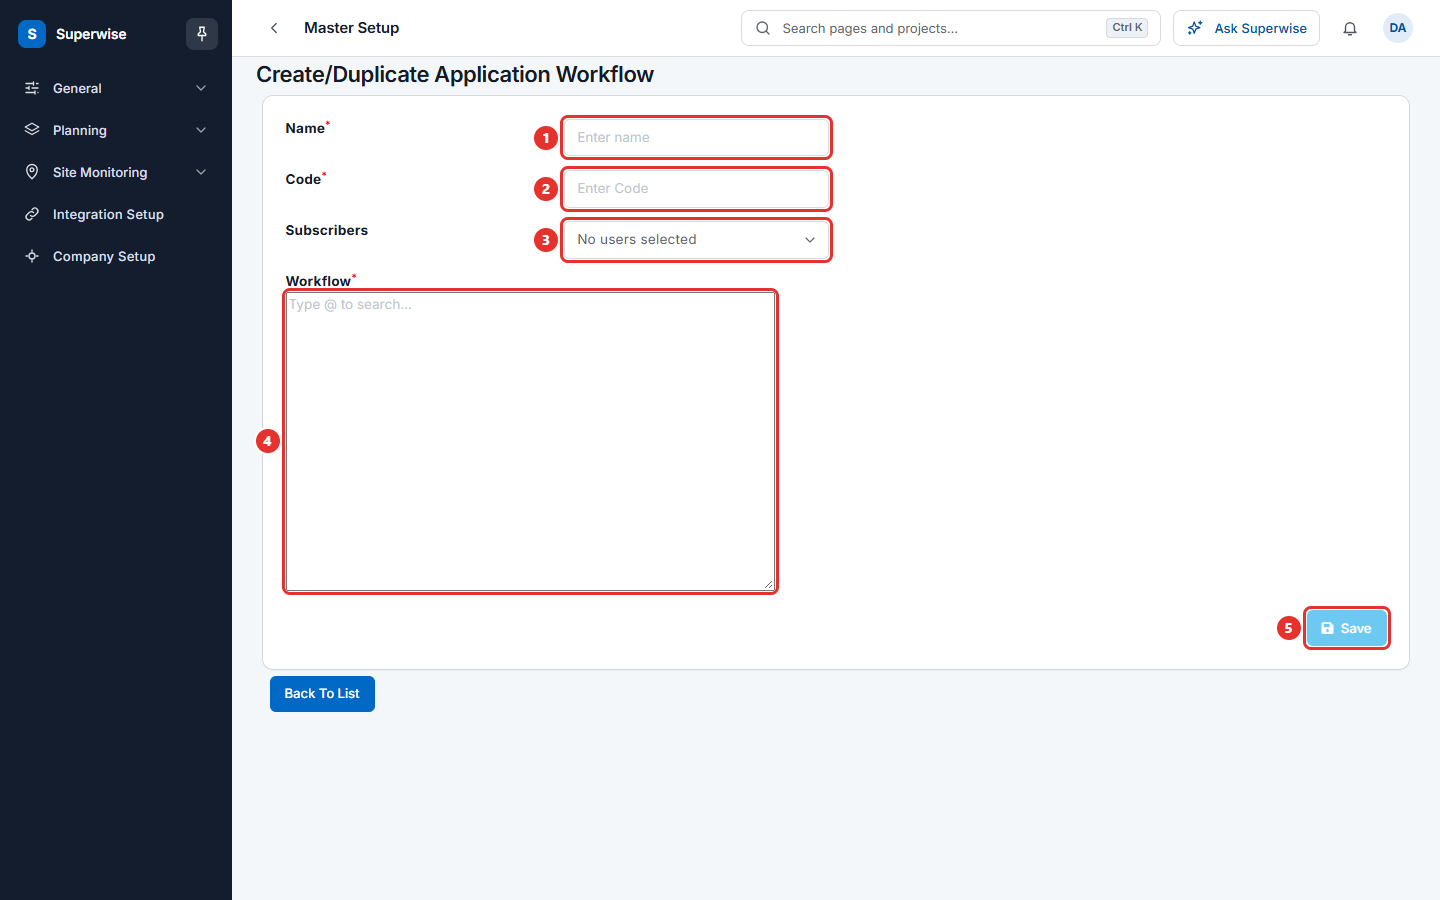
- In Name (mark 1 in the second picture), type a name, for example Purchase order approval.
- In Code (mark 2), type a short code, for example POA. The code must be new.
- In Subscribers (mark 3), choose the users who get a message when an approver acts on a record. This is optional.
- In Workflow (mark 4), write the steps. Write one step on each line. Type @ and choose a role or a user from the list. See the next section.
- Check the picture on the right of the box. It shows the steps as a chart. If it says Invalid Workflow, fix the text.
- Click Save (mark 5). A message says Workflow Saved.
How to write the steps
Each line is one step. The first line is the first approver. Superwise sends the record to the lines in order.
@Role("Site Engineer") in 1 day
@Role("Project Manager") in 2 days
@Role("Accounts Head")
- Type @ and choose User or Role and the name from the list. The text shows as
@Role("Site Engineer")or@User("name"). - Add
in 2 daysafter the name to set the review time in days. - To let two or more approvers work at the same step, write them on one line and separate them with a comma.
- The last line must have a single approver.
How to see, copy or delete a workflow
- In the list, click the three dots at the end of the row (mark 3 in the first picture).
- Choose Show to see the chart. The box has the buttons Download to save the chart as a picture and Close. If the workflow has subscribers, a button also switches between the chart and the list of subscribers.
- Choose Duplicate to start a new workflow from a copy of this one. Change the name, the code and the steps, then click Save.
- Choose Delete to remove the workflow. Confirm the question "Are you sure that you want to delete this workflow?".
How to choose the workflow for each area
Company-wide settings apply to every project.
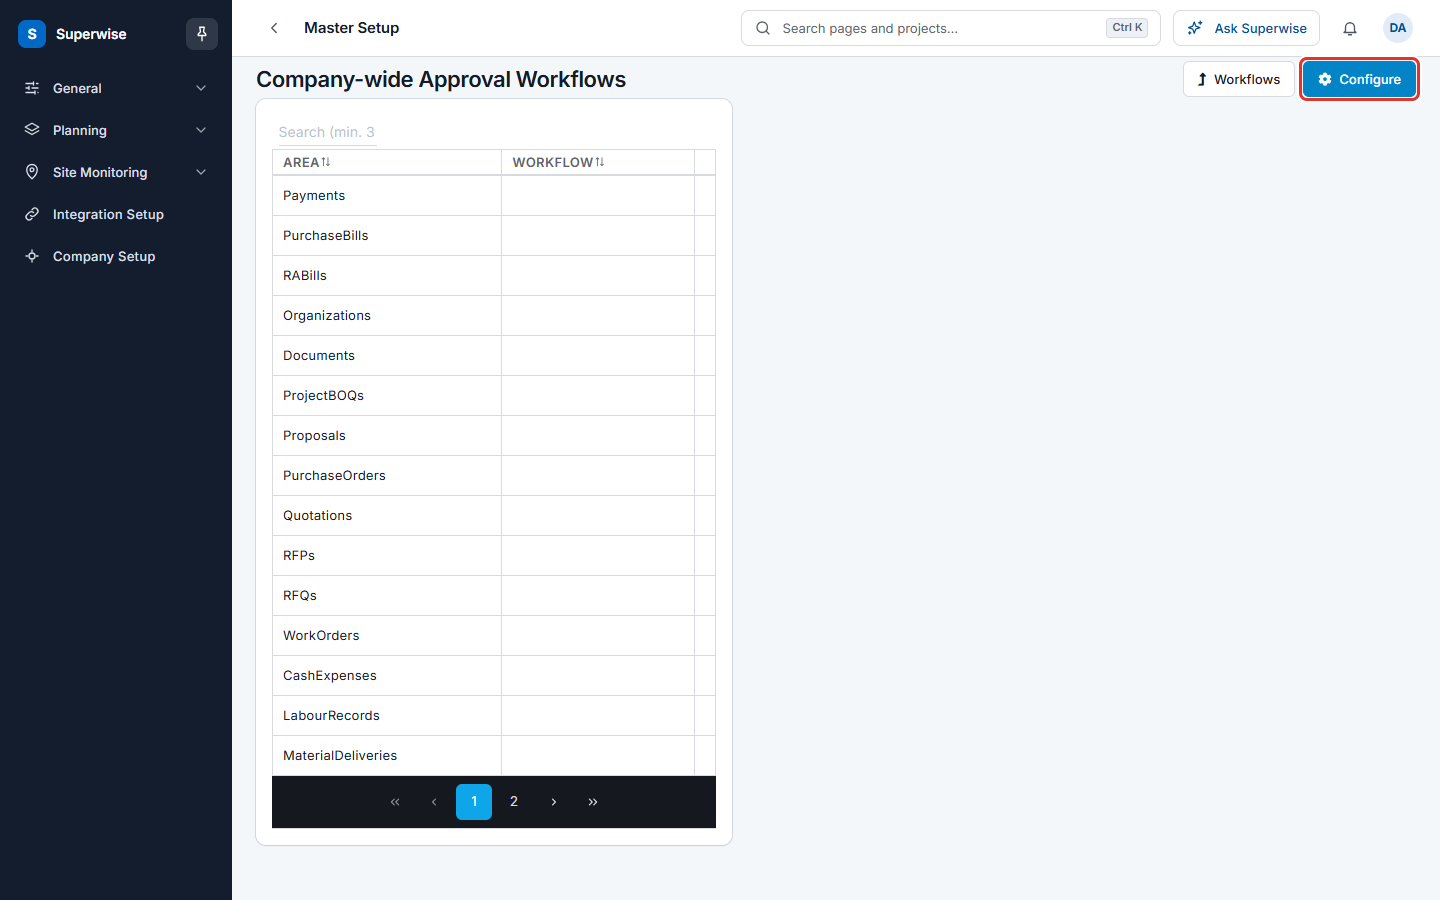
- On the list of workflows, click Global Configuration (mark 2 in the first picture). The page Company-wide Approval Workflows opens with the columns Area and Workflow.
- Click Configure (mark 1 in the third picture).
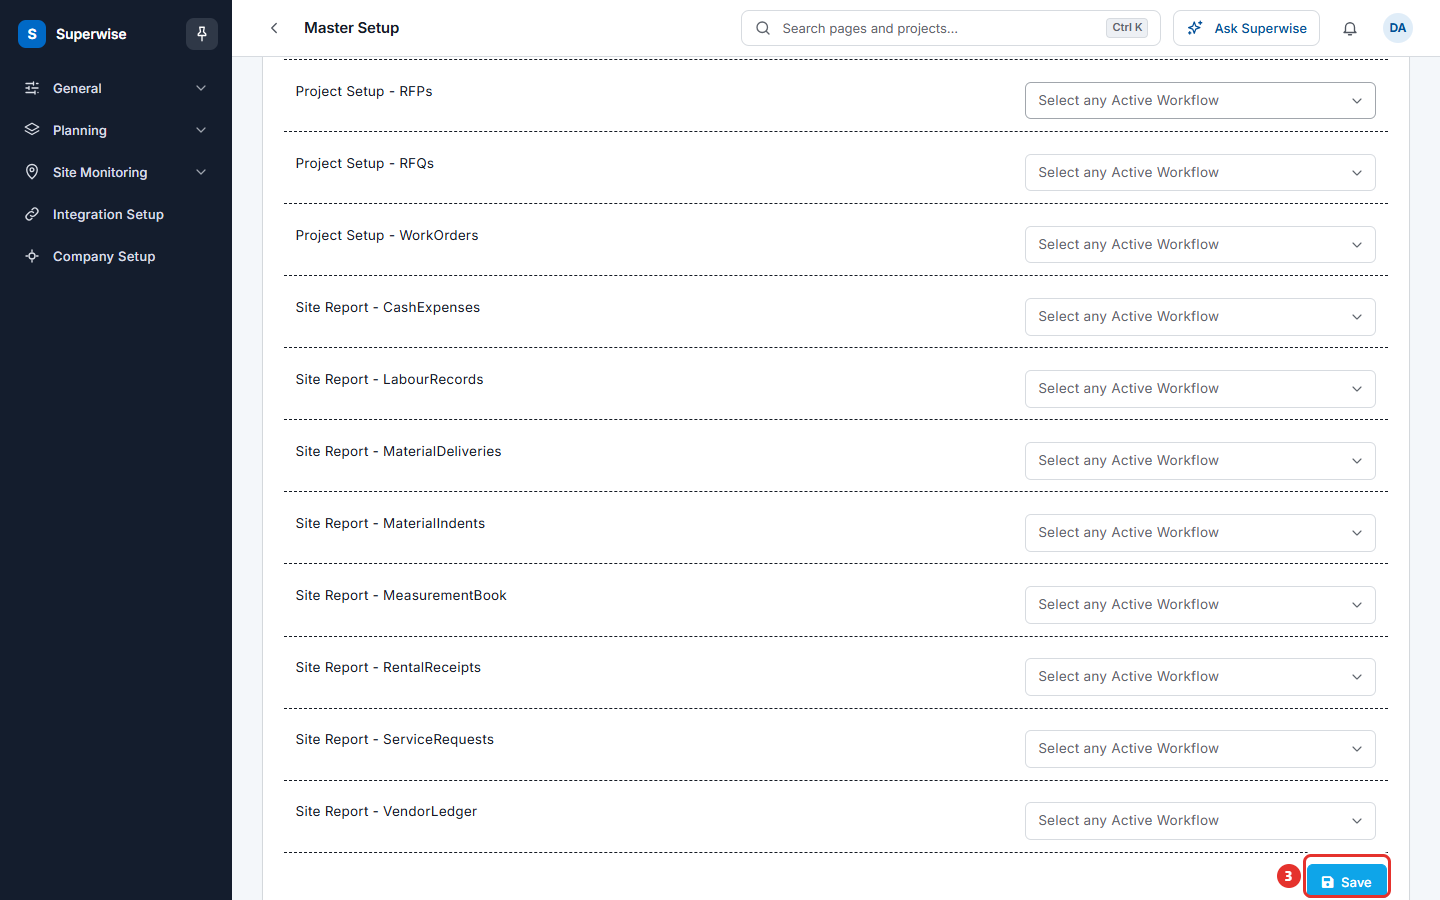
- For each area, choose a workflow in Select Workflow (mark 2 in the fourth picture). The list offers only active workflows. Leave the field empty if the area needs no workflow.
- Click Save (mark 3).
How to choose the workflow for one project
- Select the project in the project selector at the top of the page.
- On the list of workflows, click Project Configuration. The button shows only when a project is selected.
- Click Configure.
- For each area, the column Company-wide Workflow shows the company setting. Choose a workflow in Select Workflow to use another workflow for this project.
- Click Save.
What the columns mean
| Name | What it means |
|---|---|
| Name | The name of the workflow. |
| Code | The short code of the workflow. |
| Inactive? | A tick means the workflow is archived and cannot be chosen for an area. |
| Area | The part of Superwise, shown with its group, for example Accounts - Payments. |
| Workflow | The workflow chosen for the area. |
Rules to know
- The name and the code are required. A code cannot be used twice. The message is "Cannot repeat workflow code".
- Each line must name a role or a user that exists. A role cannot be used twice in one workflow. A user cannot be used twice in one workflow.
- A locked user cannot be a step or a subscriber.
- A workflow must end with a single approver.
- You cannot choose an archived workflow for an area. The message is "Cannot select Archive Approval workflow."
- Each area can have only one workflow. The message is "Multiple workflows defined for a module".
- When an approver acts on a record, the subscribers of the workflow get a message. If the workflow has no subscribers, the person who created the record gets it.
- You cannot delete a role that is a step of a workflow. See Roles.
If something goes wrong
| What you see | What to do |
|---|---|
| Invalid Workflow | Check each line. Use the list that opens when you type @. |
| Invalid user/role specified at one of the steps | The name does not match a user or a role. Choose it again from the list. |
| Approval workflow contains duplicate roles | Use each role once. |
| Approval workflow contains duplicate users | Use each user once. |
| Approval workflow should end with a single user/role | Put only one approver on the last line. |
| Cannot repeat workflow code | Type a different code. |
| Workflow has no active users. | A step has only locked users. Unlock a user or change the step. |