


Resources
Set up the list of materials, labour, machinery, tools and other items that you buy, receive and use on site, and group them in categories.
- Where to find it
- Company settings > Site Monitoring > Resources
- Who can use it
- People who have the View Resources permission. Adding needs Add, editing needs Edit, deleting needs Delete. Bulk add needs Approve.
A resource is anything you buy, receive or use on a project. Examples are White cement (material), Mason (labour), Excavator (machinery) and Drill machine (tool). You create each resource once for the whole company. Purchase orders, deliveries, stock and rate analyses then pick the resource from this list.
Each resource has a type, a category, a code, a name and a unit of measure, such as kgs or nos. It can also carry a standard rate, called schedule of rates (SOR), a tax and rules for how it is received on site.
Before you start
- Create the taxes you want to link, under Company settings > General > Taxes.
- Create a quality checklist if you want a check at delivery. See Checklists.
The five types
| Type | Use it for |
|---|---|
| Material | Goods delivered to site, such as cement or steel. |
| Labour | Workers paid by hours or days, such as a mason. |
| Machinery | Equipment, such as an excavator. A machine can name a material as its fuel. |
| Tool | Small tools that move between projects. |
| Miscellaneous | Any other item. |
The form shows only the settings that fit the type. For example, Inventory settings appear for Material and Tool only.
How to add a resource
- Open Company settings > Site Monitoring > Resources.
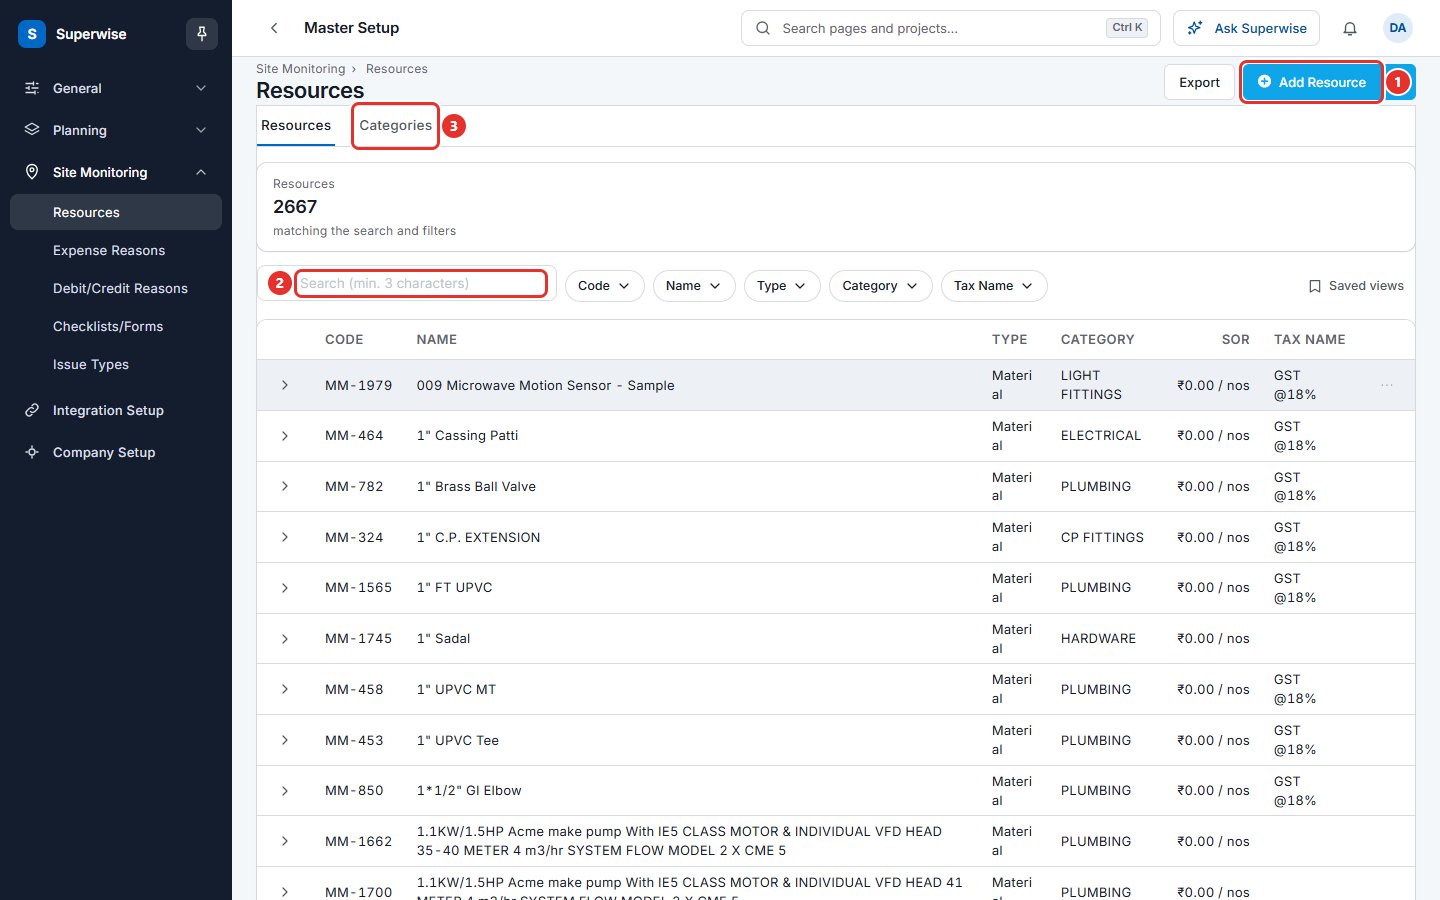
- Click Add Resource (mark 1 in the first picture). A form opens.
- Choose the Type (mark 1 in the second picture).
- Choose the Category (mark 2), or type a new category name to create it. When you choose an existing category, Superwise fills a suggested Code. If you type a new name, it suggests a code from the first two letters of the name.
- Check the Code (mark 3). It can have up to 10 characters. You can change it.
- Type the Name (mark 4). It can have up to 200 characters.
- Choose the Unit (mark 5), for example
cum,sqm,nosorkgs. - Type Specifications if you want to. The limit is 500 characters.
- In Amount details, type the SOR, choose a Tax and type a Tax Code if you need them.
- Click Save (mark 6).
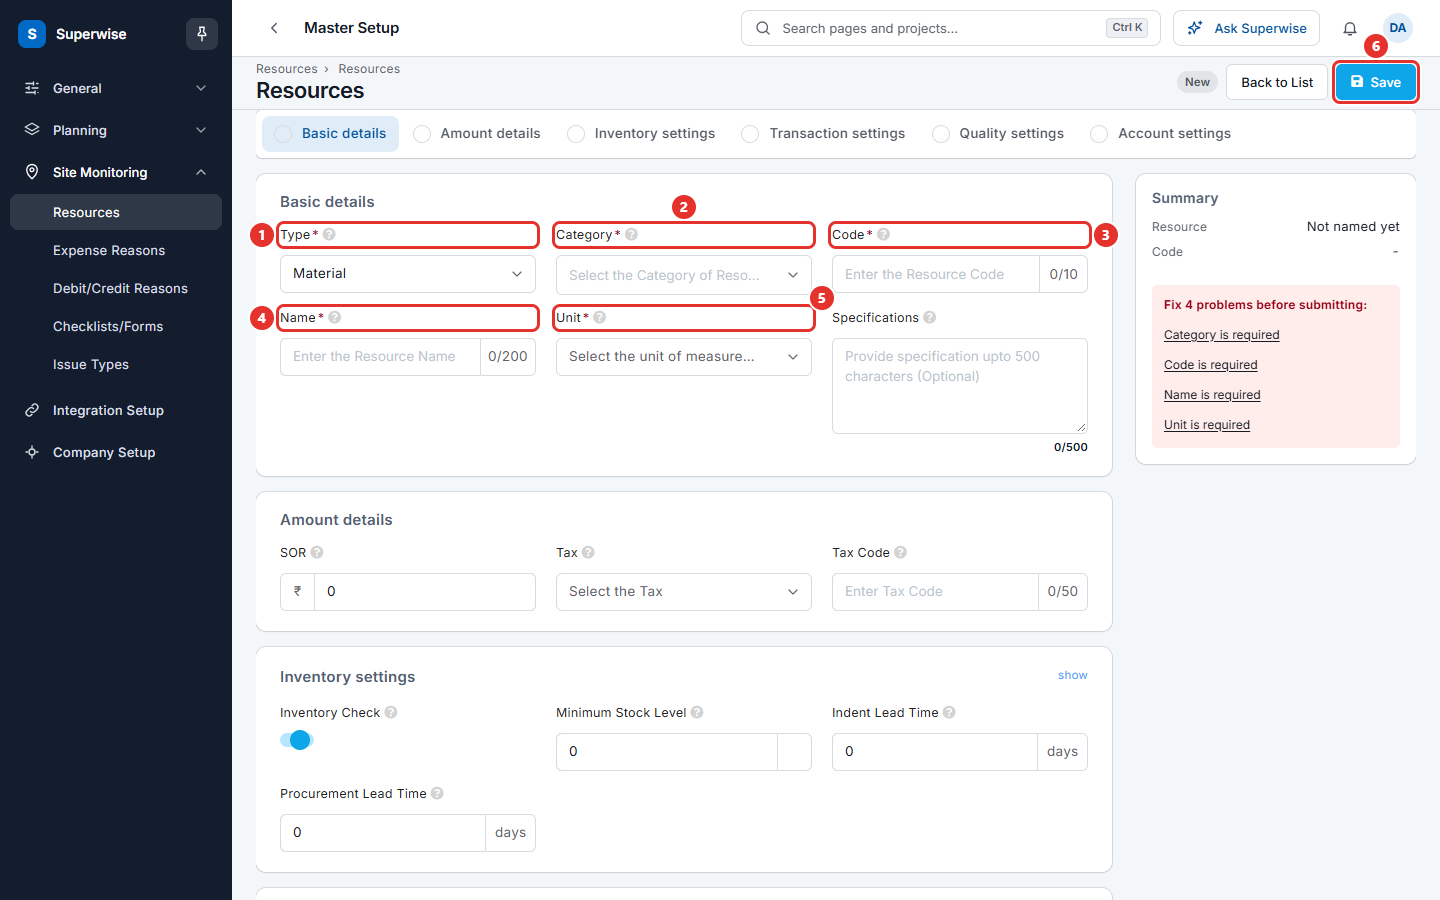
Fields marked with a star are required. The Summary on the right lists what is still missing.
How to set the rules for site use
The form has sections that open when you click show.
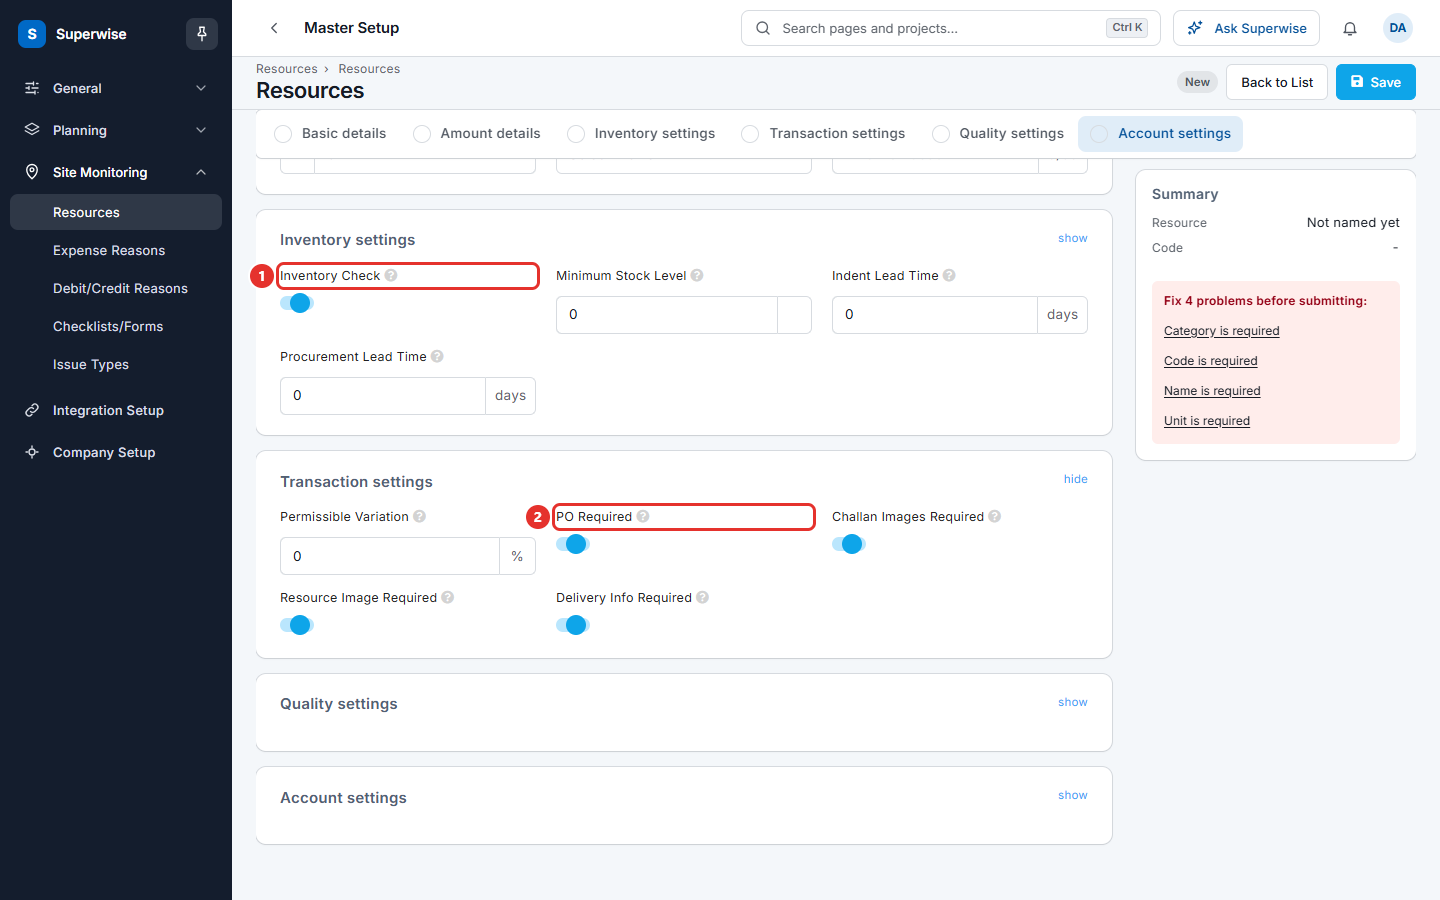
- Click show in Inventory settings to open it. Turn Inventory Check on (mark 1 in the next picture) to follow the stock of this resource. For a Material, also type Minimum Stock Level, Indent Lead Time (days) and Procurement Lead Time (days).
- Click show in Transaction settings. Type Permissible Variation to say how much more than the purchase order quantity you accept. Turn on PO Required (mark 2) when a purchase order must exist before delivery.
- Turn on Challan Images Required, Resource Image Required or Delivery Info Required to make site staff add pictures or delivery details. The first switch is named Work Images Required for Labour and Images Required for Machinery.
- For a Material, click show in Quality settings. Turn the section on and choose a Quality Checklist. Site staff then fill this checklist at delivery.
- Click show in Account settings to type the Income Account, Expense Account and Asset Account used by your accounting software.
For a Machinery resource, choose a Fuel in Amount details if the machine uses a material as fuel.
How to edit, delete or view a resource
- Click the three dots at the end of the resource row.
- Click Edit to open the form again. You cannot change the Type when there are postings on the resource, or when a purchase order or purchase bill uses it.
- Click Delete. A box Confirm Action asks you to confirm. Click Confirm.
Click the arrow at the start of a row to see details. The Suppliers tab lists suppliers with their rate and contact. The Other Details tab shows PO Required, Inventory Check, Delivery Info, Quality Check, Resource Image and Challan Image.
Use the Code, Name, Type, Category and Tax Name buttons above the list to filter. Click Export to download the list.
How to add many resources at once
- Click the arrow at the right of Add Resource and click Bulk Add Resource. You need the Approve permission for resources.
- Fill one row for each resource, or paste rows from a spreadsheet. Code and Name are required in every row. The other columns are Type, Unit, Category, Tax Code, Specifications, Rate, Lead Time (Indent), Lead Time (Procurement), Min. Stock, Inventory, Tax, PO Required and Image Required.
- Click Save (the mark in the picture).
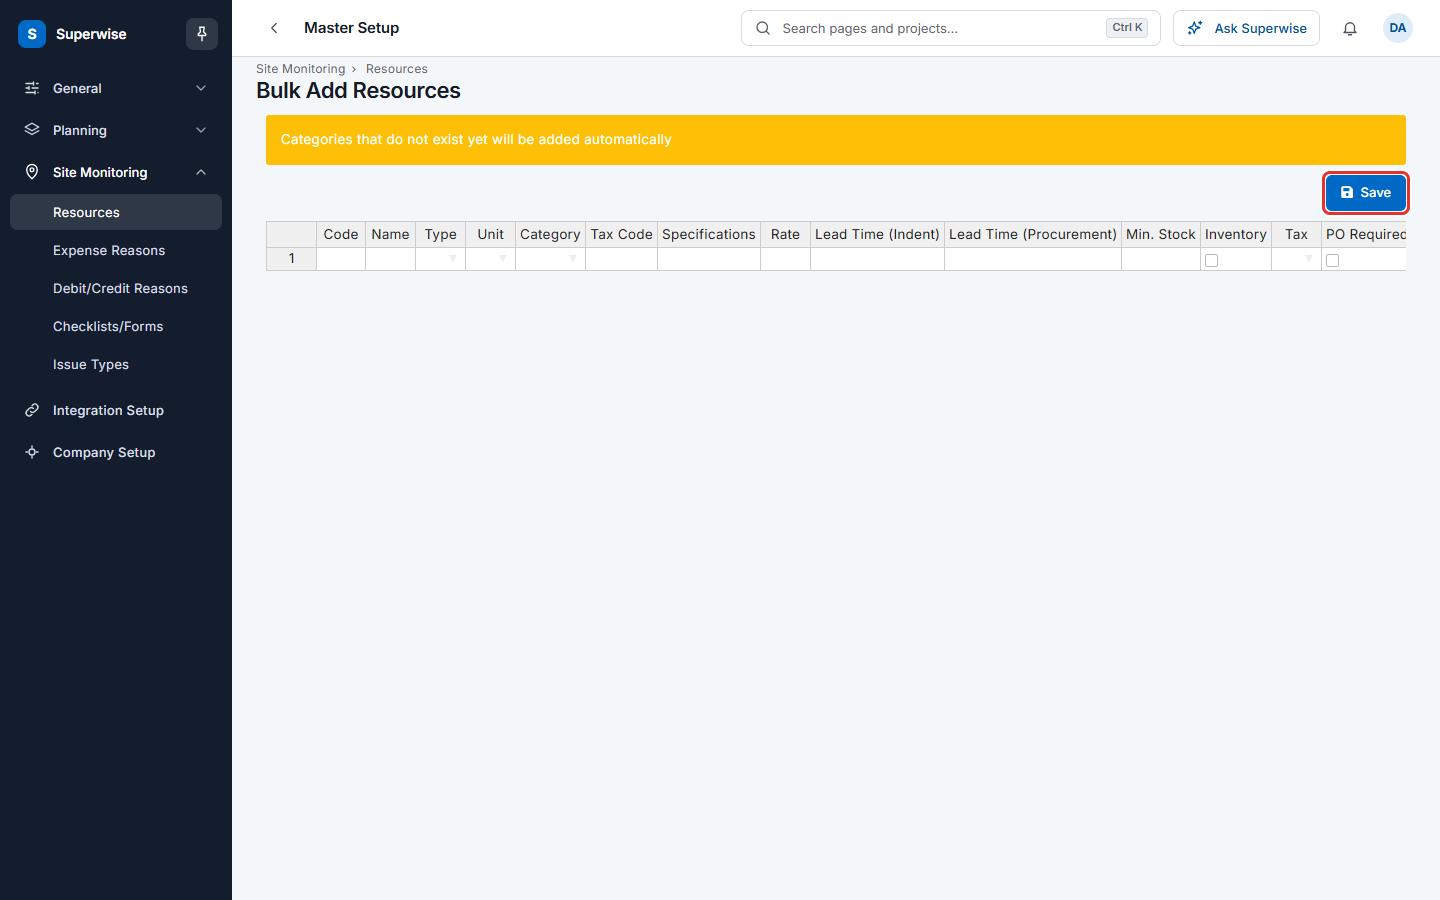
Categories that do not exist yet are added for you. If any row is wrong, Superwise saves nothing and lists the problems. Fix them and save again.
How to manage resource categories
- Click the Categories tab (mark 3 in the list picture).
- Click Add New Category (mark 1 in the next picture). A form opens at the side.
- Type the Name. Type a Tax Code if you want. Click show next to Account Settings for the account fields.
- Click Save.
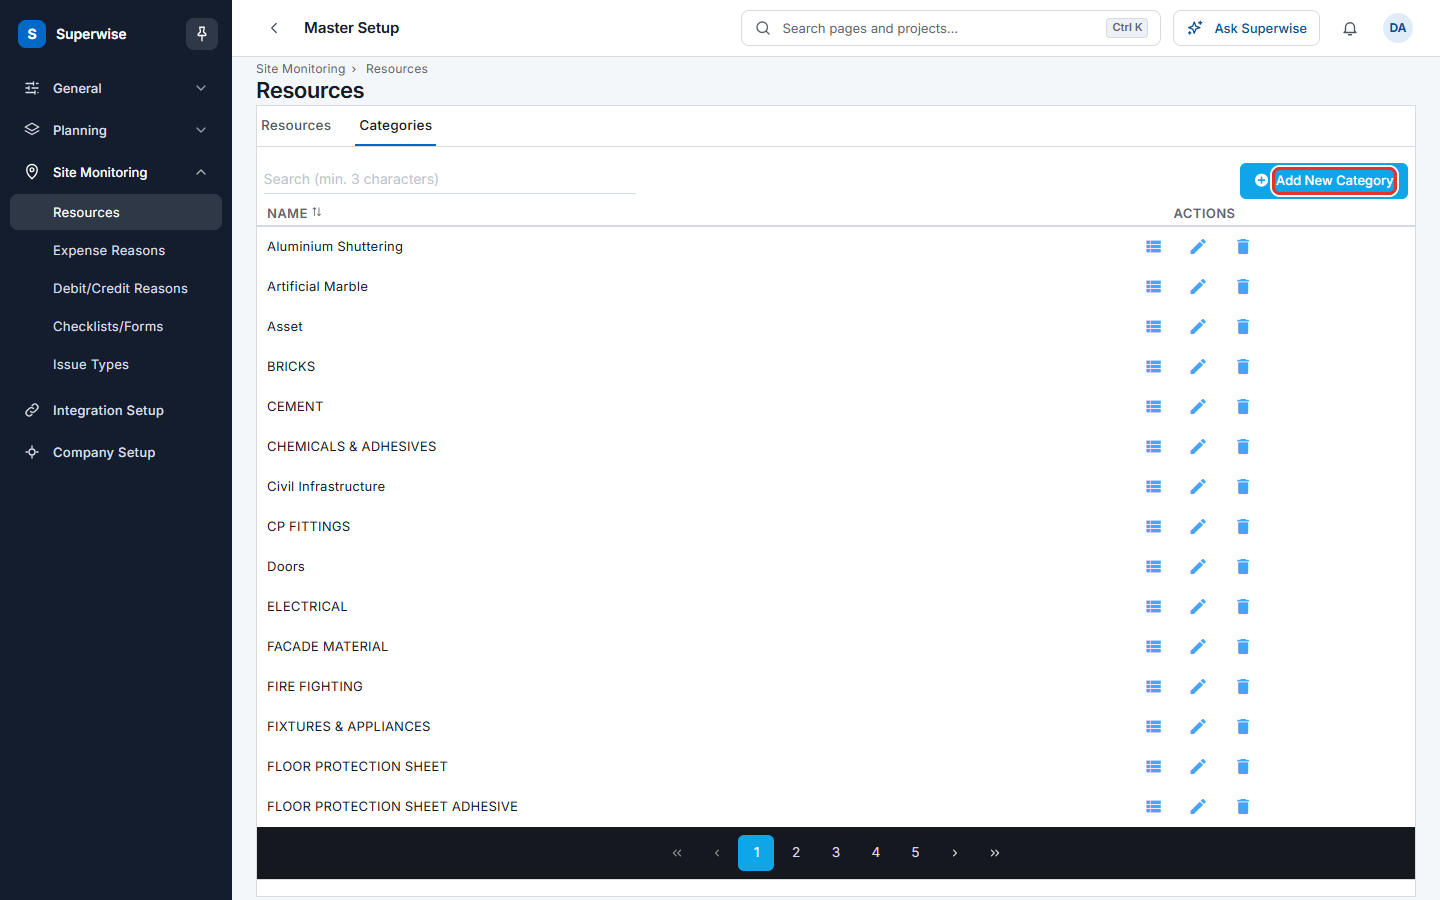
Use the icons at the end of a category row. View resources shows the resources of that category. The pencil edits the category. The bin deletes it.
The resource variation page
The resource variation page shows one resource in one project. It is a tree by area. It compares planned and actual values. The columns are Area, Planned BOQ Quantity, Actual BOQ Quantity, Planned Resource Quantity, Actual Resource Quantity, Commissionned Quantity, Planned Rate Analysis and Actual Rate Analysis. Click the arrow at the start of a row to open the next level.
What the columns mean
| Name | What it means |
|---|---|
| CODE | The short code of the resource. |
| NAME | The resource name. |
| TYPE | Material, Labour, Machinery, Tool or Miscellaneous. |
| CATEGORY | The group of the resource. |
| SOR | The standard rate, shown with its unit, for example ₹0.00 / nos. SOR is short for schedule of rates. |
| TAX NAME | The tax linked to the resource. |
Rules to know
- A resource name and a resource code cannot repeat. A category name cannot repeat.
- A category is required. A resource without a category cannot be saved.
- You cannot change the type of a resource that has postings, or that a purchase order or purchase bill uses.
- You cannot delete a resource that other records use. The system shows one message for each kind of record. You cannot delete a category that has resources: Category has resources linked to it.
- In bulk add, a code or name that already exists, an unknown type or an unknown unit stops the whole save.
If something goes wrong
| What you see | What to do |
|---|---|
| Category is required, Code is required, Name is required or Unit is required | Fill the field named in the Summary. |
| Resource Name cannot be repeated. | Search the list and use the existing resource. |
| Resource Code cannot be repeated. | Use another code. |
| Resource Type cannot be changed if there are Postings on the Resource and/or Purchase Order/Purchase Bill has been created for the Resource | Keep the type. Create a new resource if you need another type. |
| Category has resources linked to it | Move the resources to another category first. |
| Code, Name, Type, Category are mandatory fields for resources in bulk add | Fill these columns in each row. |
| Invalid unit or Invalid type followed by a name | Choose the value from the list in the grid. |
Related pages
- Checklists: the quality checklist you can link to a material.
- Work items: rate analysis uses resources.
- Templates: task sheets list labour resources.
- Site monitoring masters: the order to set up the site lists.