


Create a schedule
Build the schedule from a file or a task table, verify it, and save the tasks so Superwise works out the dates.
- Where to find it
- Planning > Schedule
- Who can use it
- People who have the Edit Tasks permission can open the table. The Schedule page that follows opens for anyone who can use Planning > Schedule.
There are two ways to make the schedule of a project. You can draw it in the Playground. Or you can type or import a table of tasks. This page explains the table and the last step that both ways share: Save Tasks.
The table is useful when you already have a plan in Excel, Microsoft Project or Primavera. You import the file, check the tasks, and save.
Before you start
- Choose the project at the top of the page.
- Have your plan as a file in one of these types:
.xlsx,.mppor.xer. The file must be smaller than 75 MB. - Set the working days of the project in the working calendar. The dates follow it. See Working calendar.
How to create the schedule from a file
- Open Planning > Schedule.
- In the window Select Scheduling Method, click Use Existing File. The window opens only when the project has no plan yet.
- In the box Import File, click Select file and choose your file. The box shows only while the table is empty.
- Click Process. Superwise asks: "Importing the file will replace existing rows". Confirm.
- The tasks appear in the table. Check them. You can change a cell by typing in it.
- Click Verify. Superwise checks the table and shows the schedule as bars.
- If the bars are right, click Save. To go back and change the table, click Edit Mode.
- Superwise opens the Schedule page of the project. Continue with the steps in the next section.
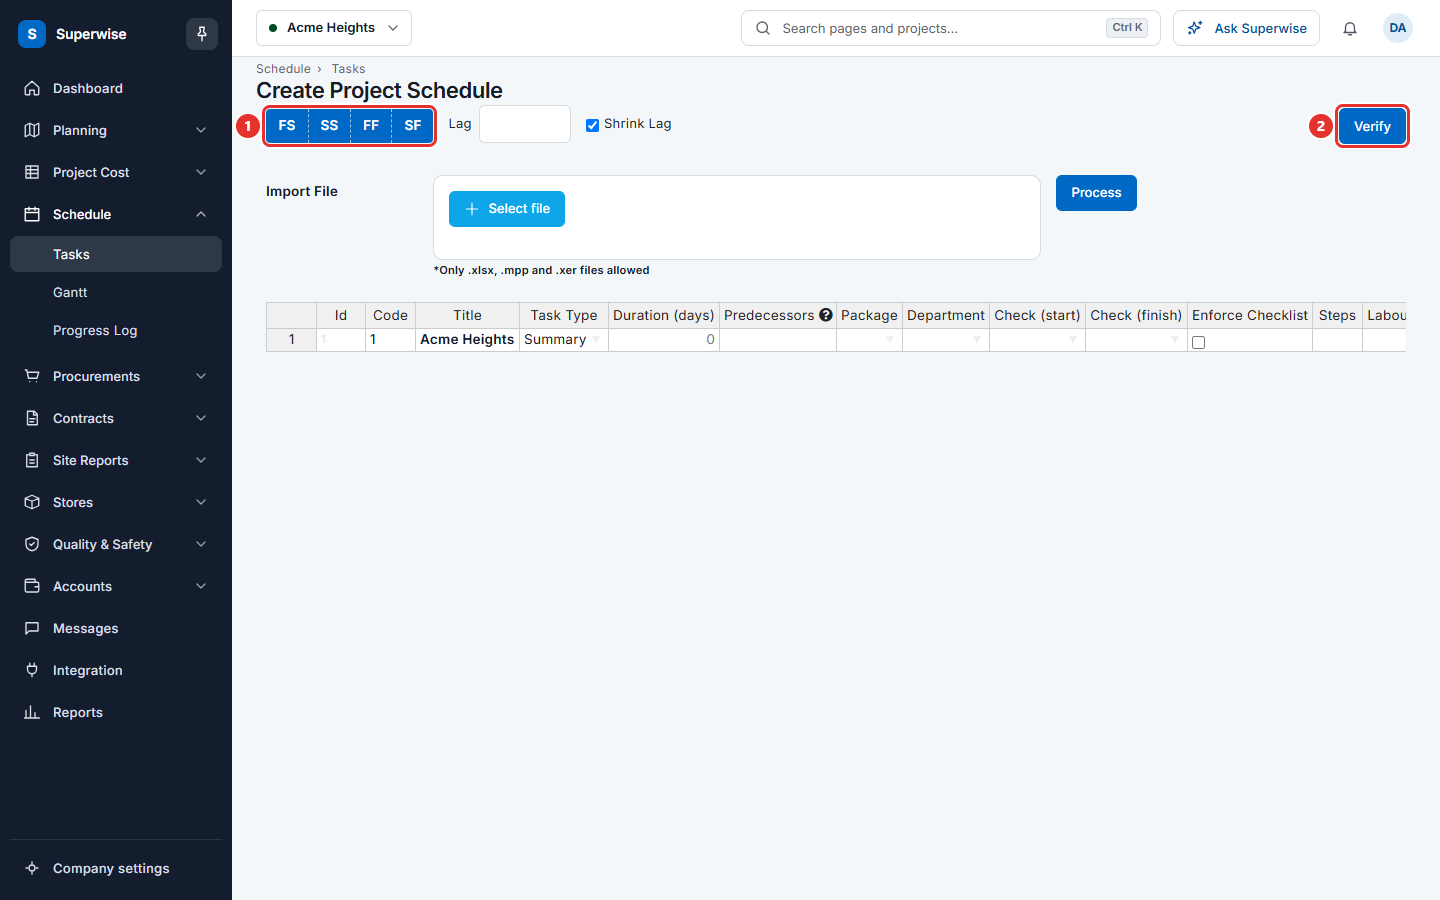
If Superwise finds a problem, it shows a red list above the table. Fix each row and click Verify again. After you change a cell, the button says Re-Verify.
What the table columns mean
| Name | What it means |
|---|---|
| Id | The number of the row. Predecessors use this number. |
| Code | The place of the row in the work breakdown structure, for example 1.2.3. |
| Title | The name of the task or area. |
| Task Type | Task, Milestone, Dummy or Summary. A summary row groups the rows below it. |
| Duration (days) | How long the task takes. Hourly projects show Duration (hours). |
| Predecessors | The Id of the task that must happen first. |
| Package | The construction package of the task. |
| Department | The department that does the task. |
| Check (start), Check (finish) | The checklist to fill when the task starts, and when it finishes. |
| Enforce Checklist | Makes the checklist compulsory. |
| Steps | The steps of the task. |
| Labour Resources | The labour planned for the task. |
How to write a predecessor
Write the Id of the task that must happen first. Task 3 must start after task 2: type 2 in the Predecessors cell of task 3.
To use another relation, add its letters. 2SS means task 3 starts after task 2 starts. 2FF means task 3 finishes after task 2 finishes. 2SF means task 3 finishes after task 2 starts. The default is finish-start (2FS, or just 2).
To add a waiting time (lag), write 2FS+3d for 3 days or 2FS+3h for 3 hours. A lag that can shrink shows as 2FS+3d(S). For many predecessors, separate them with commas.
You can also select rows and use the buttons FS, SS, FF and SF with the Lag box and the Shrink Lag tick box.
How to save the tasks
You reach the Schedule page after Save in the table, or after Verify Draft in the playground.
- Check the Project Start date. Change it if the project starts on another day.
- Click Load Tasks to see the tasks in a table below. The words "Loading activities.." show while the tasks load. A large project can take some time. In the table, area rows are bold and milestones are green. The table has the columns Id, Code, Title, Task Type, Duration and Predecessors.
- Click Save Tasks.
- Superwise says that the update has started and takes 1 to 2 minutes. You can leave the page. You get a notice when it ends.
- When the update ends, the page offers a link to the Summary page. Open it to compare and send the schedule for approval. See Revisions.
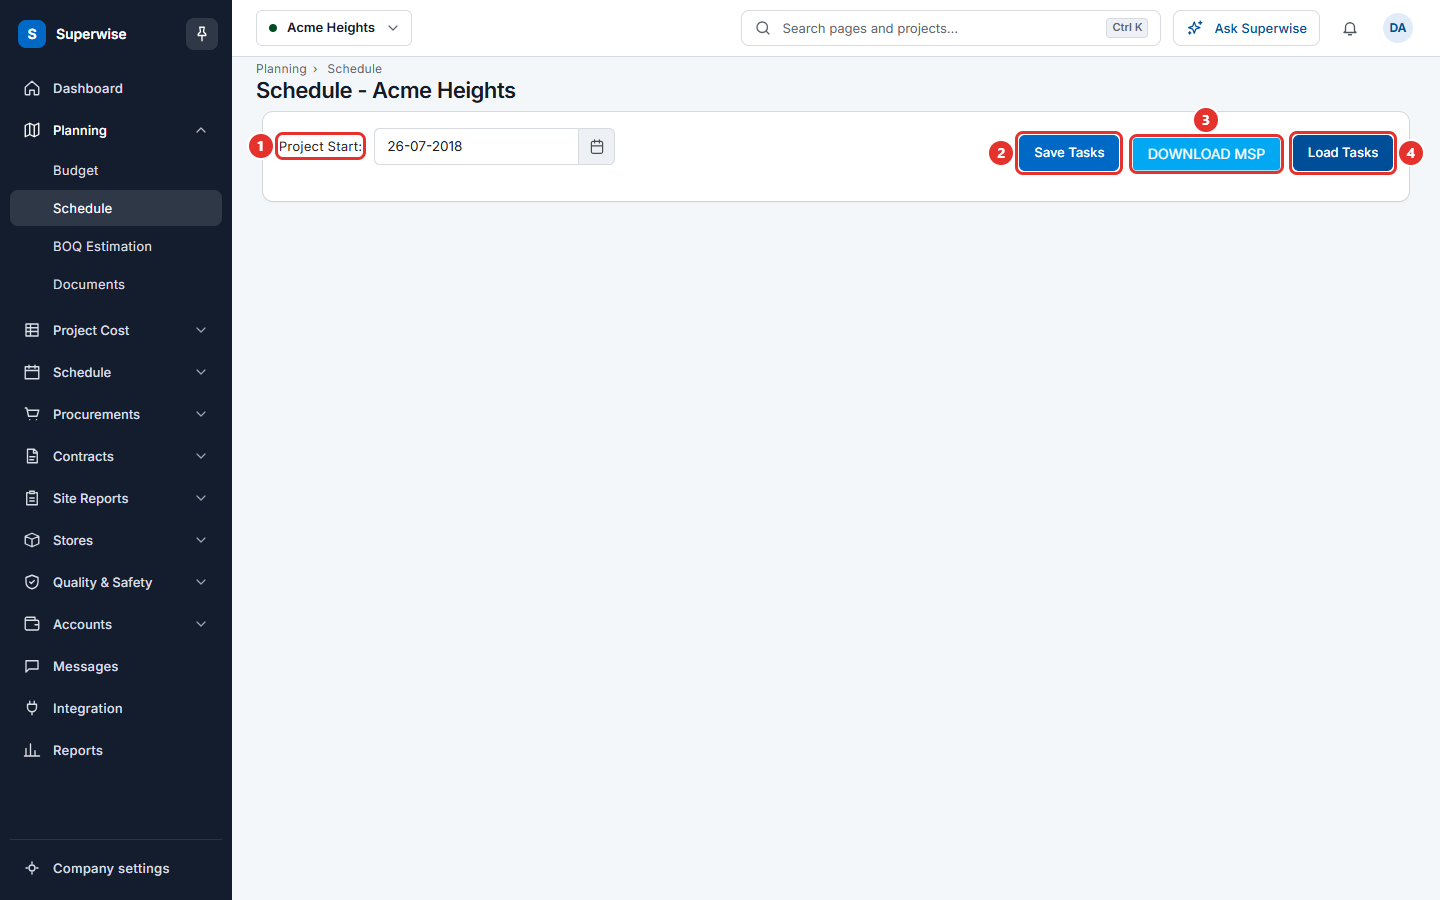
DOWNLOAD MSP gives you the plan as a file for Microsoft Project.
Rules to know
- Only one update of tasks can run at a time for a project. If another one is running, Superwise tells you to wait.
- The table is a draft. The live schedule changes only after Save Tasks and an approval.
- Importing a file replaces the rows that are in the table.
- A file with more than 10000 rows is saved in the background. The button then says Save (background).
Warning: Importing a file replaces all rows in the table. Superwise asks you to confirm first.
If something goes wrong
| What you see | What to do |
|---|---|
| Please upload .xlsx, .mpp or .xer files only | Save your plan in one of these types and choose it again. |
| Files larger than 75 MB can not be uploaded. | Split the plan, or remove columns you do not need. |
| Please select a file to import | Choose a file and wait until it is uploaded. Then click Process. |
| Another process of updating tasks is already running for this project. | Wait until it ends. You get a notice. |
| Tasks did not update. Please try again after some time. | Click Save Tasks again. If it fails again, tell your administrator. |