


Schedule a report
Send a report by e-mail or WhatsApp to chosen people every day, week or month, and run, change or delete a schedule.
- Where to find it
- Reports
- Who can use it
- People who have the Edit Reports permission.
A schedule sends the same report again and again without anyone opening the screen. You set up the report once and say who receives it and when.
For example, Acme wants the Daily (Summary) report of Acme Heights in the project manager's inbox at 7:00 every morning. The report shows the previous day.
Before you start
- You need the Edit permission on Reports.
- The recipients must be users of the project.
- For WhatsApp, a recipient needs a phone number saved in Superwise. Users without a phone number do not receive WhatsApp messages.
How to schedule a report
- Click Reports in the left menu.
- In Project and Report Type, set the report as you would to generate it. Fill the other fields as you want the report to look.
- Click Schedule this Report.
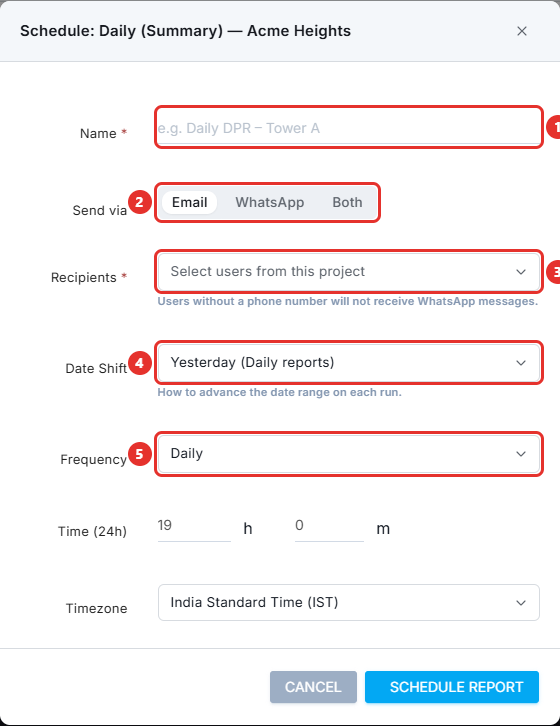
- A box opens. The title starts with Schedule: and names your report.
- In Name, type a name for the schedule (mark 1). It is required.
- In Send via, choose Email, WhatsApp or Both (mark 2).
- In Recipients, choose the users who get the report (mark 3). It is required. Choose at least one.
- In Date Shift, say how the dates move on each run (mark 4). See the table below.
- In Frequency, choose Daily, Weekly or Monthly (mark 5). For Weekly, choose the Day.
- In Time (24h), enter the hour (h) and the minute (m).
- In Timezone, choose India Standard Time (IST) or UTC.
- Click Schedule Report. Superwise shows Report scheduled successfully.
For Monthly, the report runs on the first day of each month.
| Date Shift | What it does |
|---|---|
| Yesterday (Daily reports) | Each run reports the day before the run. |
| Last 7 days (range reports) | Each run reports the 7 days before the run. |
| Last month (Monthly reports) | Each run reports the month before the run. |
| Fixed – keep dates as-is | Every run uses the dates you chose. |
How to see and change your schedules
The table Scheduled Reports below the form lists every schedule. The columns are Name, Schedule (Cron), Next Run, Last Run, Status, Channel, Date Shift and Recipients. Schedule (Cron) is the schedule written in a short code that computers read. Status shows Succeeded, Failed or Not run yet.
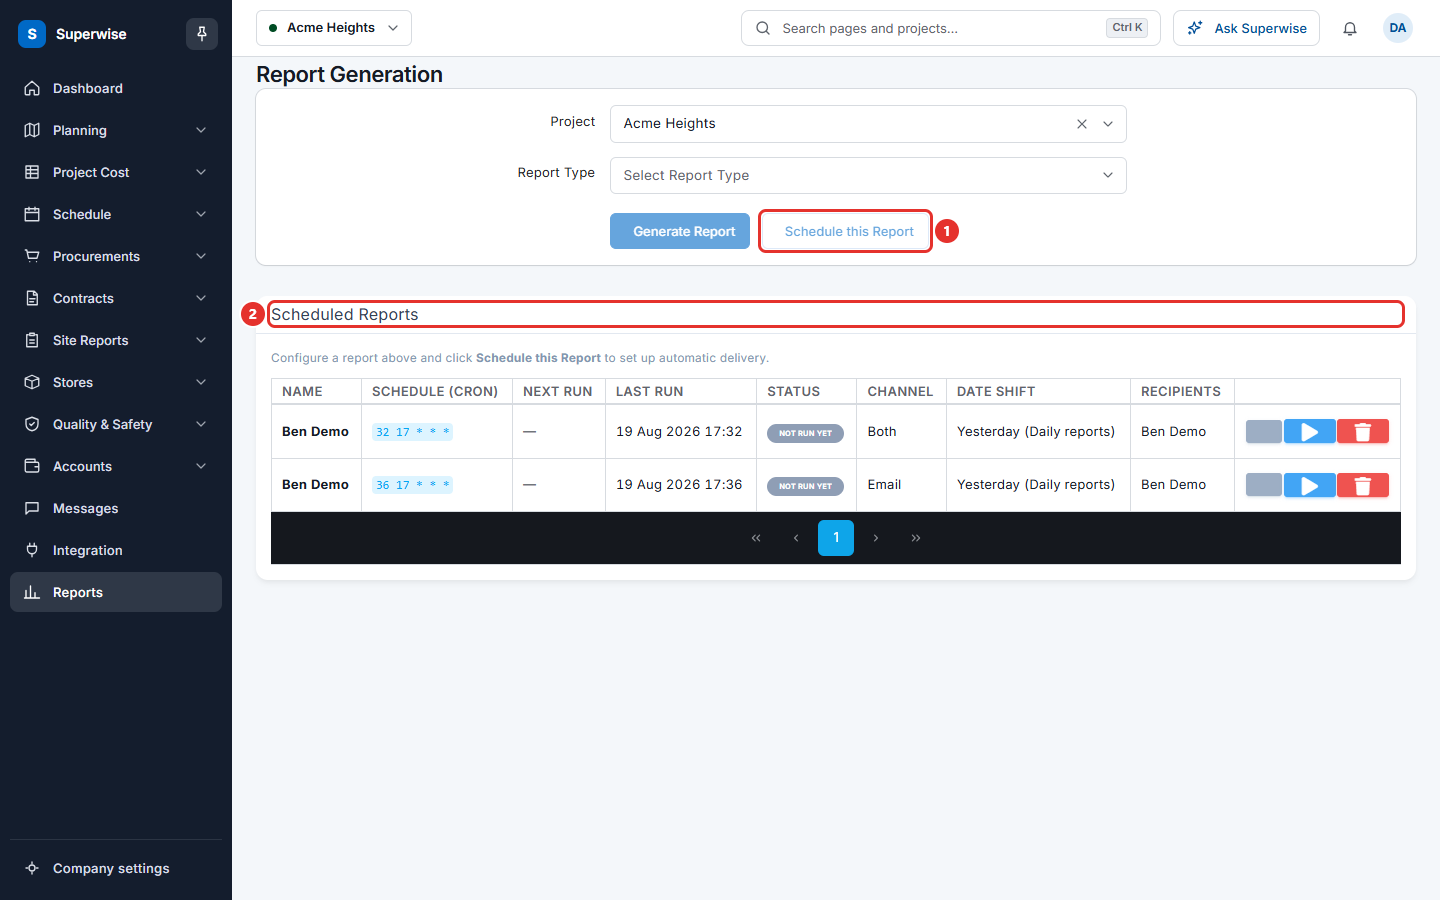
At the end of each row there are three buttons.
| Button | What it does |
|---|---|
| Edit | Opens the box so you can change the schedule. The title starts with Edit schedule:. Click Save changes. |
| Run now | Sends the report at once, and asks you to confirm. |
| Delete | Removes the schedule after you confirm in Confirm Delete. |
What the fields mean
| Name | What it means |
|---|---|
| Name | The name you give the schedule, for example Daily progress of Acme Heights. |
| Send via | The way the report is sent. |
| Recipients | The users who get it. |
| Date Shift | How the dates move at each run. |
| Frequency | How often it runs. |
| Day | The weekday of a weekly schedule. |
| Time (24h) | The hour and the minute of the run. |
| Timezone | The clock that the time follows. |
If something goes wrong
| What you see | What to do |
|---|---|
| Please enter a name for this schedule. | Type a Name. |
| Select at least one recipient. | Choose a user in Recipients. |
| Could not create scheduled report. | Try again. If it fails again, tell your administrator. |
| The Schedule this Report button is not active. | Choose a project and a report type first. |