


Create a work order
Make a work order for a contractor in five steps. Start from a winning proposal, from an old work order, or from nothing.
- Where to find it
- Contracts > Work Orders
- Who can use it
- People who have the Add Work Orders permission. Approving at once needs the Approve permission.
The form Create Work Order has five steps: Work Order Details, BOQ Details, Cost Details, Miscellaneous and Summary. You fill the steps in order and save on the last one. You can click any step in the bar at the top to go back and change it.
Before you start
- Select the project in the project selector at the top of the screen. The work order is made for that project.
- The contractor must be in the system. A contractor that is not approved shows the word "Inactive" in the list.
- The BOQ items of the work must exist in the project. See Project BOQ.
How to start a work order
There are three ways to start:
- From nothing. Open Contracts > Work Orders and click New work order.
- From a proposal. Open Contracts > Proposals and click the Award icon of the winning proposal. The form opens with the contractor, the BOQ items, the rates, the tax and the terms of the proposal. The advance of the proposal becomes the Mobilization Amount. See Proposals.
- From an old work order. Click the three dots of a work order and choose Duplicate. The form opens with the data of that work order. A warning message reminds you that you are making a copy. Change what is different.
How to fill the work order
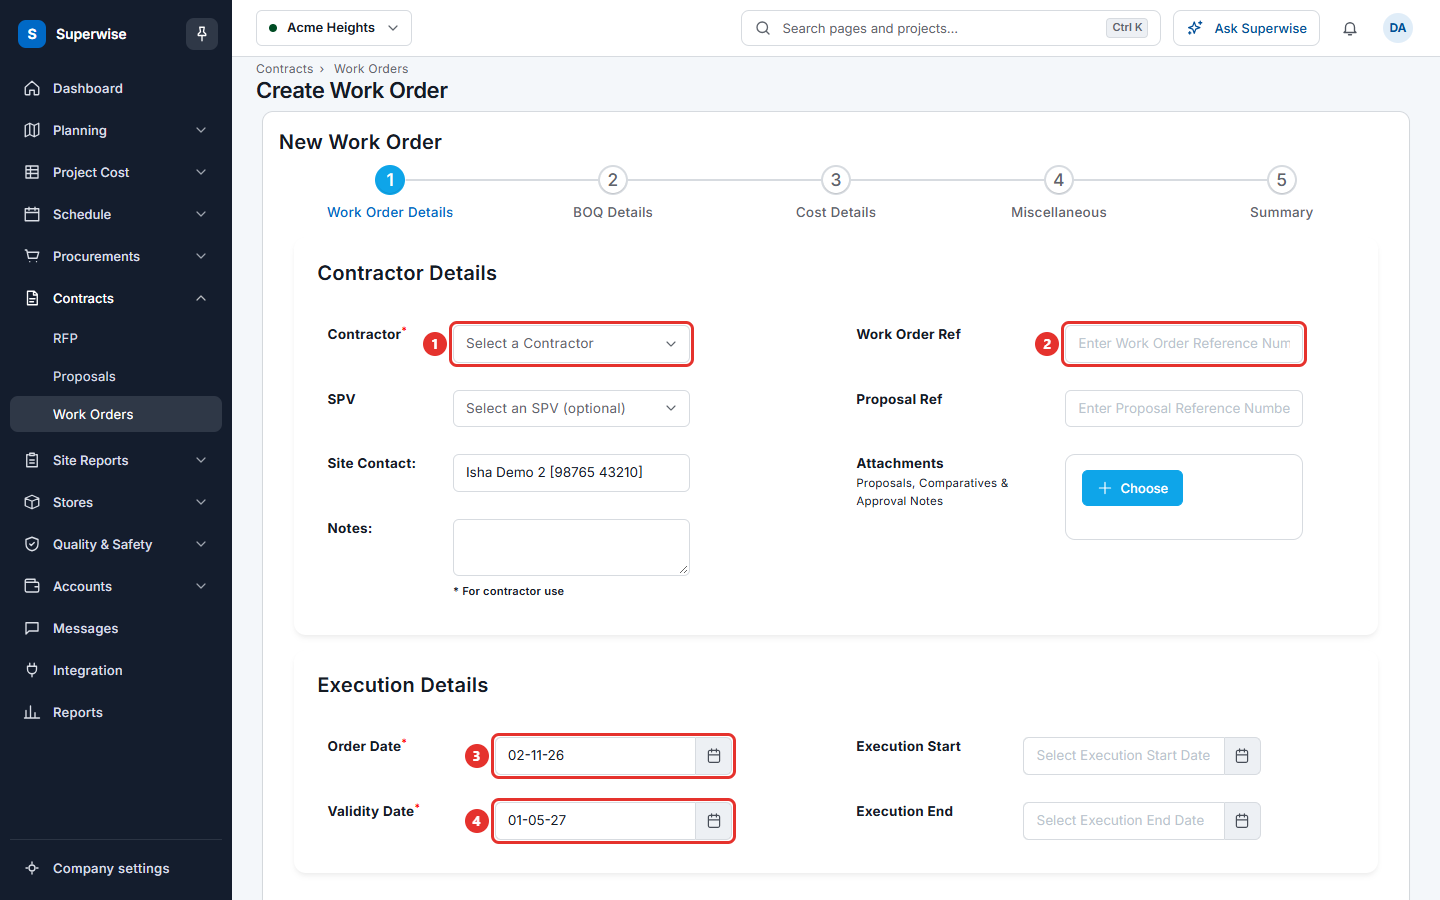
Step 1: Work Order Details
- Choose the Contractor (mark 1 in the picture). A star shows the field is required.
- Choose the SPV if the work order is for a special purpose vehicle. This is optional.
- Type the Site Contact, a name and a phone number. This is optional.
- Type Notes for the contractor. The note is shown to the contractor.
- Type the Work Order Ref (mark 2) and the Proposal Ref. Both are optional.
- Under Attachments, click Choose to add files, such as the proposal, the comparison and the approval notes. Each file can be up to 10 MB.
- Set the Order Date (mark 3) and the Validity Date (mark 4). Both are required. A new form starts with today as the order date and a validity of six months.
- Set Execution Start and Execution End if you know them. These are optional.
Step 2: BOQ Details
Here you list the BOQ items of the work.
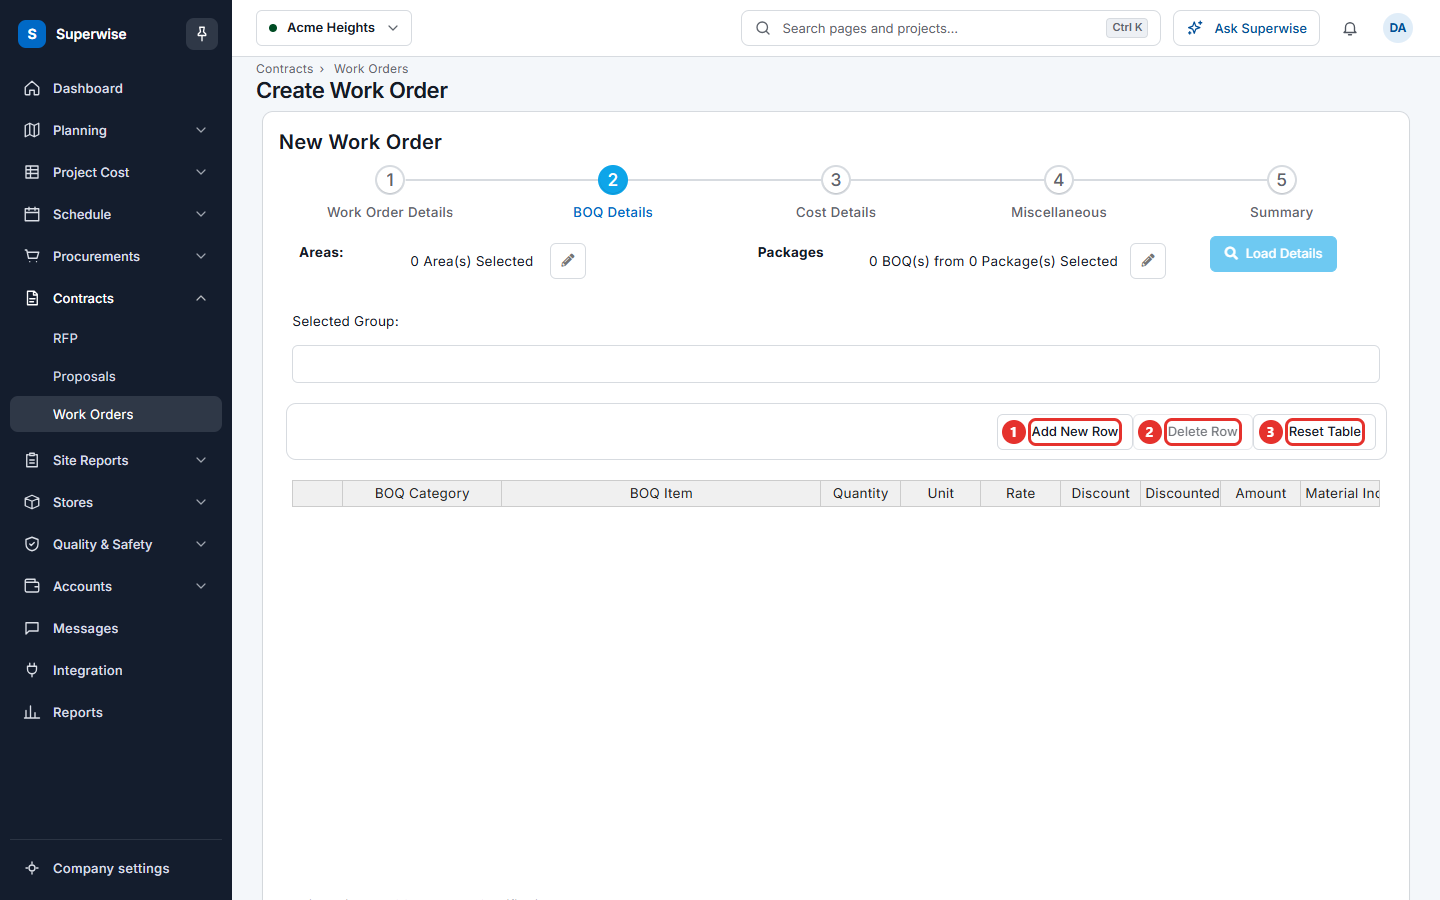
- Click Add New Row (mark 1). A row is added.
- Choose the BOQ Category, then the BOQ Item, in the row.
- Type the Quantity.
- Type the Rate. The Unit shows by itself.
- Type the Discount as a fraction. To give 5 percent, type 0.05. The Discounted Rate and the Amount are worked out for you.
- Repeat for each item.
To add a note for one item, right-click the BOQ Item cell and choose Add/Edit Specifications. To remove the note, choose Remove Specifications.
To remove rows, select them and click Delete Row (mark 2). To empty the table, click Reset Table (mark 3).
Material Included? shows if the rate includes the material. You cannot change it here.
If the project has a schedule made from a template, you can fill the table from the schedule. Click the pencil next to Areas and Packages, choose them, and click Load Details. A work order made this way is linked to the tasks of the schedule. Then Add New Row is not available.
Step 3: Cost Details
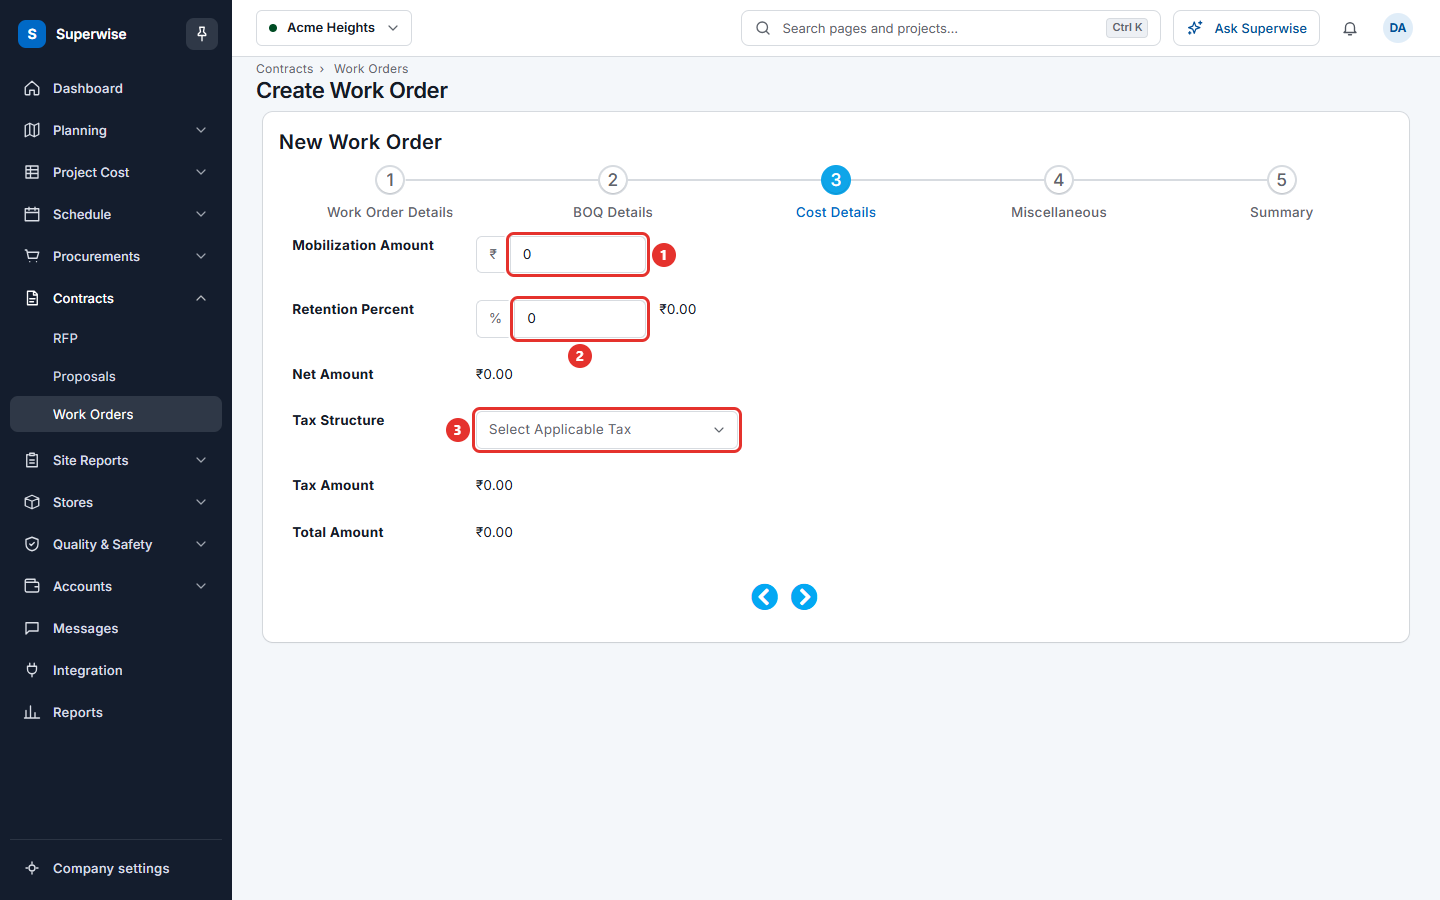
- Type the Mobilization Amount, the advance you pay to the contractor at the start.
- Type the Retention Percent, the part of each bill that you keep until the work is complete. The amount shows next to it.
- Choose the Tax Structure.
Net Amount, Tax Amount and Total Amount are worked out for you.
Step 4: Miscellaneous
- Choose a Standard T&C and click Add to put a standard clause in the text. This is optional. The standard terms are made in Terms and conditions.
- Write or edit the Specifications & Conditions. This is the text of the contract.
- Type Comments if you want to leave a note for the approver.
Step 5: Summary
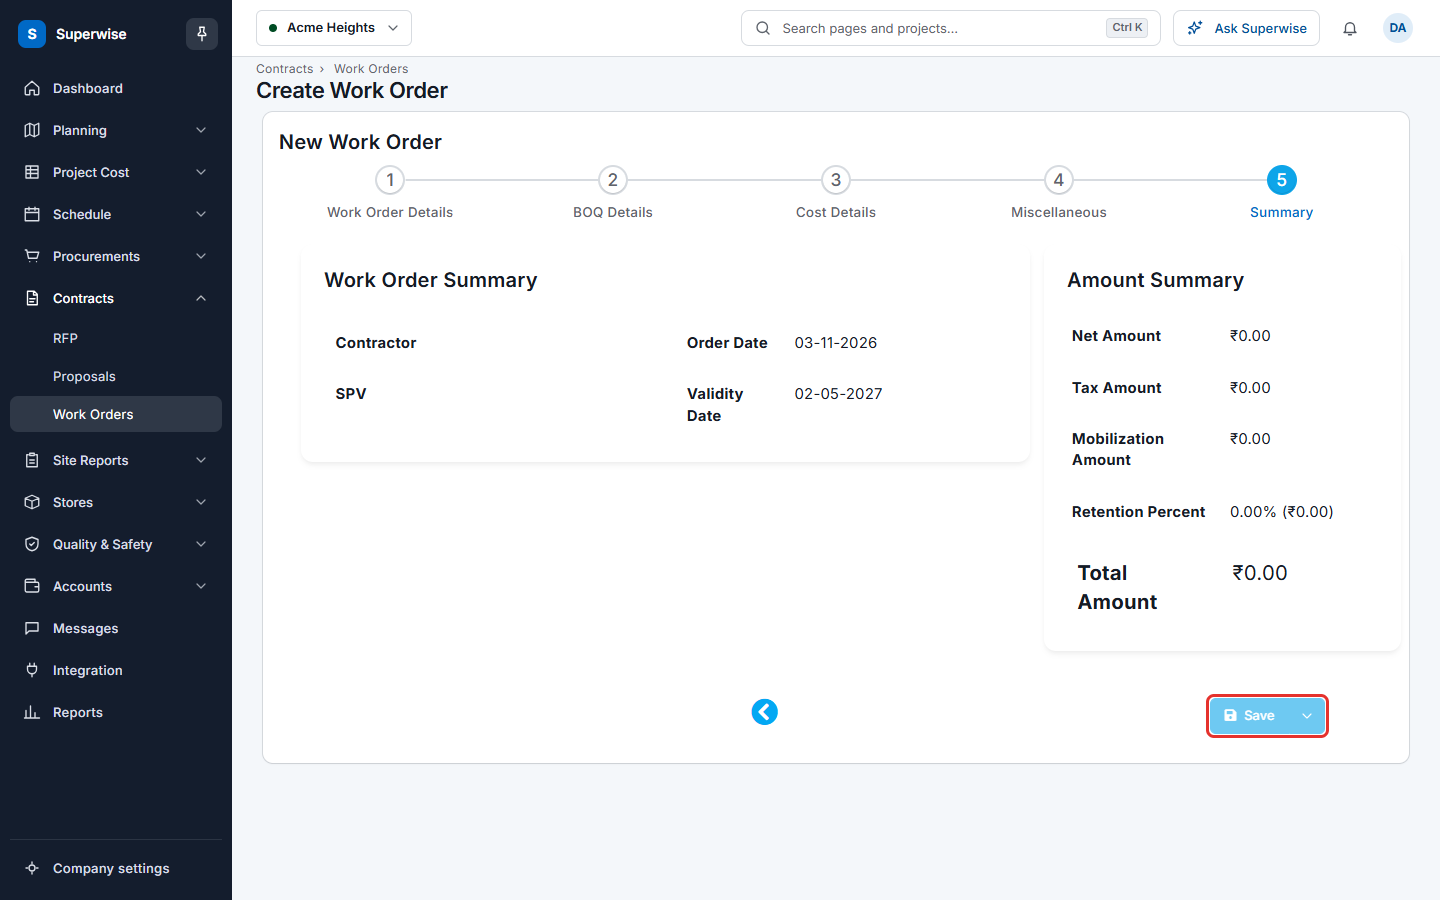
The last step shows the contractor, the dates, the BOQ summary and the Amount Summary. Check it, then save.
How to save
On the last step, use the button Save (mark 1 in the picture).
- Save sends the work order for approval. The status is Pending.
- Open the small menu of the button and choose Save as Draft to keep it as a draft. A draft is not sent for approval.
- The menu also offers Save and Approve. It shows only if you have the Approve permission and the project has no approval workflow. The work order is approved at once.
After you save, the message "Work Order Saved Successfully." shows and the list opens. Next, an approver approves the work order.
What the fields mean
| Name | What it means |
|---|---|
| Contractor | The contractor who does the work. Required. |
| SPV | A special purpose vehicle, for a contract that is billed through one. Optional. |
| Site Contact | The person on site who the contractor calls. |
| Notes | A note for the contractor. |
| Work Order Ref | Your own reference number for the work order. |
| Proposal Ref | The reference number of the proposal of the contractor. |
| Order Date | The date of the work order. Required. |
| Validity Date | The last date the work order is valid. Required. |
| Execution Start and Execution End | The planned dates for the work. |
| Mobilization Amount | The advance for the contractor. It cannot be more than the Net Amount. |
| Retention Percent | The part of each bill that you keep. |
| Tax Structure | The tax for the work order. |
| Specifications & Conditions | The text of the contract. |
Rules to know
- You need a contractor, an Order Date and a Validity Date.
- The Validity Date cannot be in the past.
- The dates must follow this order: Order Date, Execution Start, Execution End, Validity Date.
- A BOQ item can be in the work order once. Each line needs a quantity and a rate above 0.
- The quantity of a line cannot be more than the BOQ quantity that is still free. Other work orders for the same BOQ item count too.
- Either all lines or none of the lines are linked to activities.
- The Save button stays grey while a cell in the table is wrong.
If something goes wrong
| What you see | What to do |
|---|---|
| Work Order Details not added | Add at least one line in step 2. |
| Work Order Details has duplicates | The same BOQ item is on two rows. Remove one. |
| There are duplicate BOQs present in the Work Order. Please fix the data before proceeding further. | The same BOQ item is on two rows. Remove one before you go to the next step. |
| Work Order Details have invalid Quantity | Give every line a quantity above 0. |
| Work Order Details have invalid Rate | Give every line a rate above 0. |
| Work Order for '[code] name' exceeds available BOQ Quantity | Lower the quantity. Another work order already uses part of the BOQ quantity. |
| Work Order Validity cannot be before today's date | Choose a Validity Date in the future. |
| Order date should be before Validity date. | Move the Order Date or the Validity Date. |
| Execution Start date should be before Execution End date. | Fix the execution dates. |
| Order date should be before Execution Start date. | Move the Execution Start after the Order Date. |
| Execution End date should be before Validity date. | Move the Validity Date after the Execution End. |
| Mobilization amount cannot be greater than Net Amount | Lower the Mobilization Amount. |
| All (or none) of the Work Order details should be linked with activities | Link every line to activities, or none of them. |
| Billing milestones have not been configured correctly. Please correct or remove the milestone to proceed ahead | Choose a WBS and a task for each milestone, or remove it. |