


Report an issue
Report a problem on site, choose its type and priority, assign it to a person, and link it to a task. You can also edit an open issue.
- Where to find it
- Quality & Safety > Issues
- Who can use it
- People who have the Add permission on Issues. Editing needs Edit.
Use this form to report a problem on site. For example, a crane at Acme Heights is not available and the lifting work stops. You describe the problem, say how urgent it is, and give it to the person who must fix it.
The form has steps. A star after a name means the field is required. The steps are Basic Details, Attachments (optional), Departments (optional), Linked Tasks (optional) and Summary.
Before you start
- Select the project in the project selector at the top of the screen.
- You need the Add permission on Issues.
- To link the issue to a task, the project needs a schedule. The Linked Tasks (optional) step shows only for people who can view tasks.
How to report an issue
- Open Quality & Safety > Issues and click Create. The form opens.
- In step Basic Details, choose the Type of issue (mark 1).
- Choose the Priority (mark 2): Low, Moderate, High or Critical.
- Type the Title (mark 3). The title can have up to 50 characters.
- Type a Description (optional) of up to 500 characters.
- Add Labels (optional): type a word and press Enter. You can add up to 5 labels. Labels help you search for issues later.
- If you have the Approve permission, you can also set Opened Date. Use it when you report an issue that happened in the past.
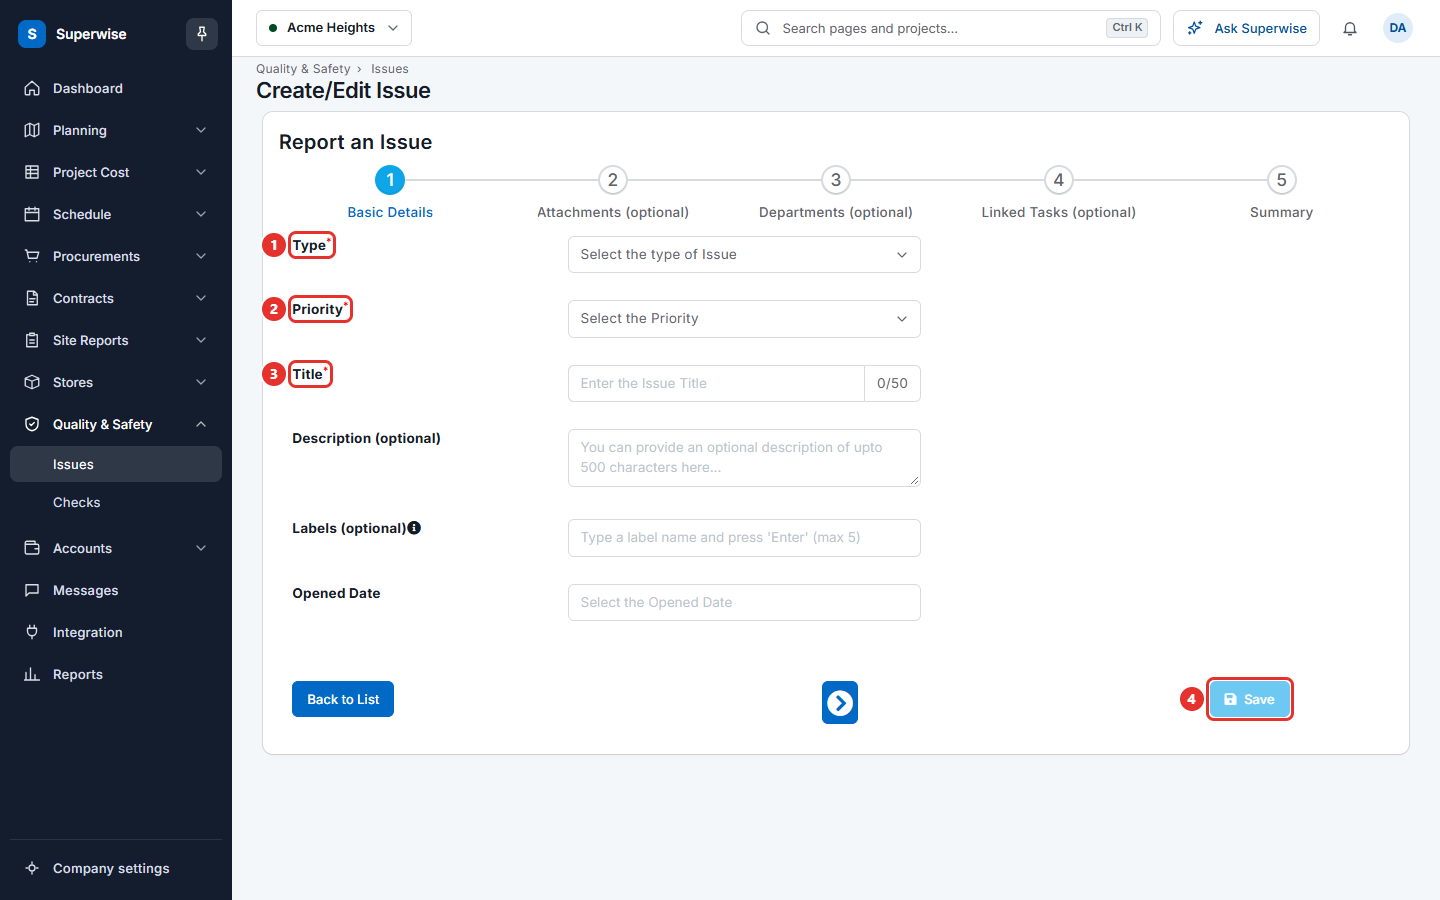
- Click the right arrow at the bottom, or click the step name, to go to the next step. In Attachments (optional), add photos or files.
- In step Departments (optional), choose Assign To (mark 1), the person who must fix the issue. Then choose the Department and the Organization if they apply. If the person belongs to a contractor, the screen fills the organization for you.
- Add Watchers (mark 2). Watchers are people who follow the issue. The table lists NAME and E-MAIL. Choose a user in Select a user to Add as Watcher and click Add. You can also type the e-mail of the user.
- Choose the Targeted Resolution Date (mark 3), the day by which the issue should be fixed.
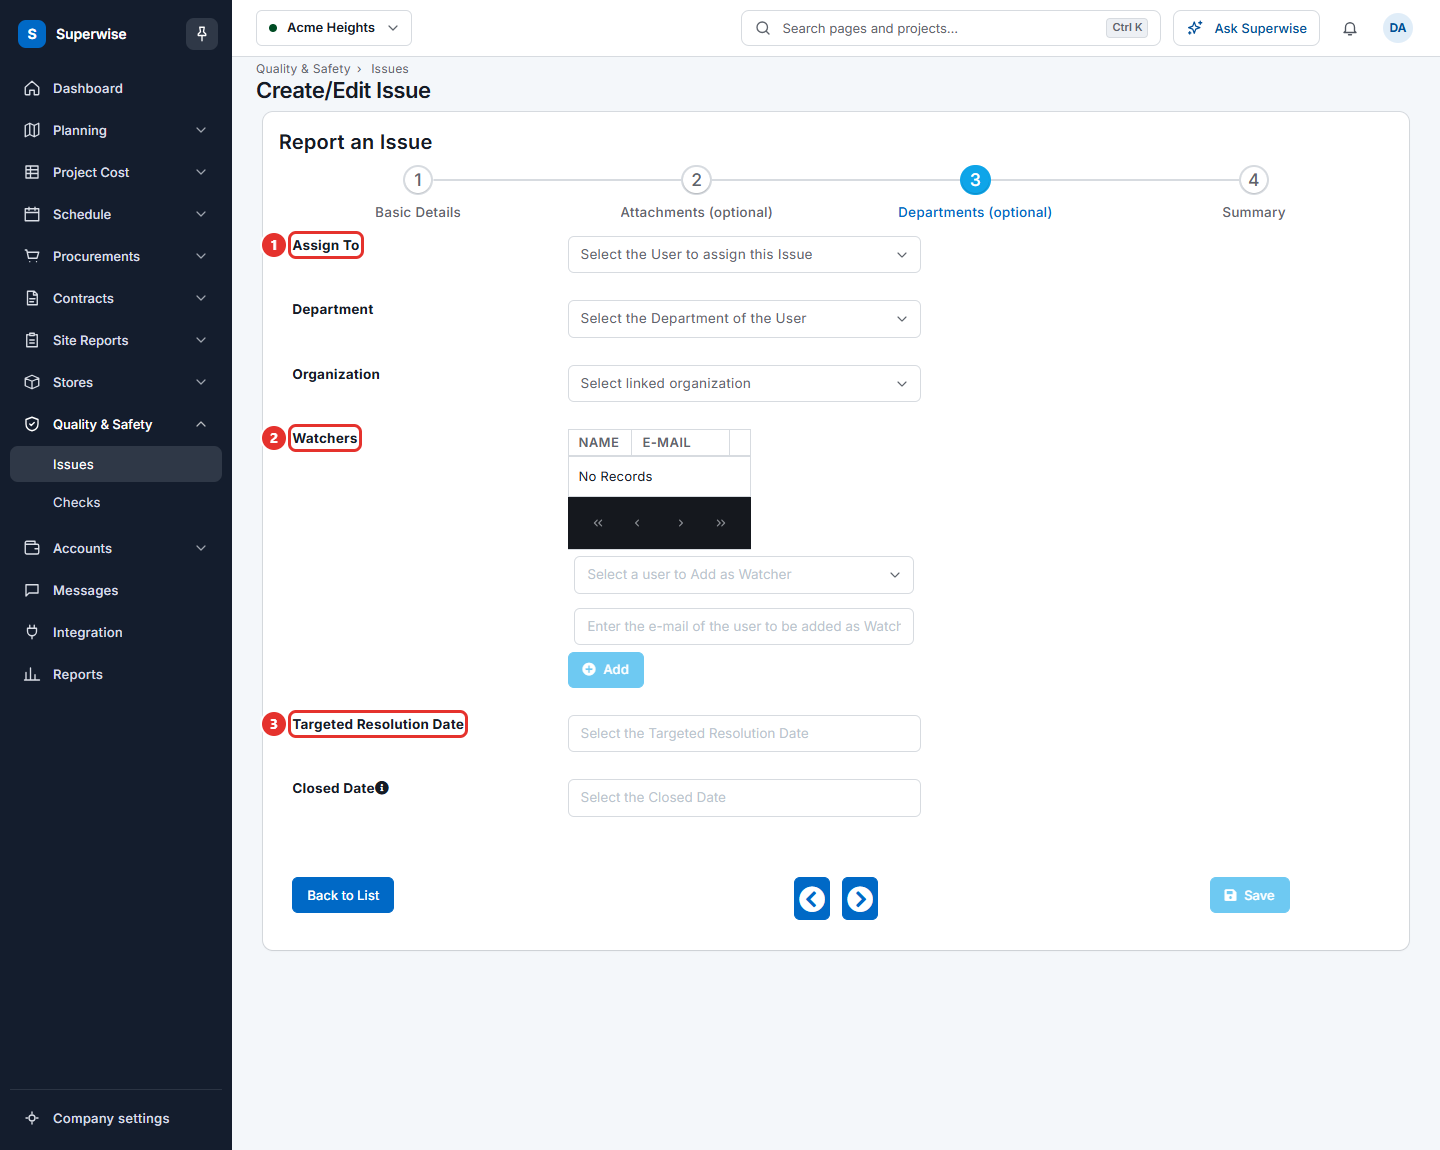
-
In step Linked Tasks (optional), choose the Area, the WBS and the Task that the issue affects. If you choose only a task, the system fills the area and the WBS.
-
In step Summary, check the values.
- Click Save. The list opens again. The new issue is Open.
Click Back to List to leave without saving.
How to edit an issue
- In the list, click the three dots at the end of an Open issue.
- Choose Edit. The same form opens with the saved values.
- Change the values and click Save.
To change only the assignee, use Change Assignee in the same menu.
What the fields mean
| Name | What it means |
|---|---|
| Type | The kind of issue. Types are grouped by category. |
| Priority | How urgent the issue is. |
| Title | A short name, up to 50 characters. |
| Opened Date | When the issue was opened. Only people with the Approve permission see it. |
| Assign To | The person who must fix the issue. |
| Department | The department of the person. |
| Organization | The contractor or company linked to the issue. |
| Watchers | People who follow the issue. |
| Targeted Resolution Date | The day by which the issue should be fixed. |
| Closed Date | Only for people with the Approve permission. Setting it resolves and closes the issue at once. |
Rules to know
- Type, Priority and Title are required. Save stays grey until they are filled.
- For people without the Approve permission, the Targeted Resolution Date cannot be before today. When they edit, it cannot be before the date the issue was opened.
- People with the Approve permission cannot set a date after now. The Targeted Resolution Date and Closed Date cannot be before Opened Date. Opened Date is required when you set Closed Date.
- The assignee must belong to the department you choose.
- You can edit only an Open issue.
If something goes wrong
| What you see | What to do |
|---|---|
| Invalid Issue Type | Choose the type again. |
| Targeted Closure Date cannot be before today's date | Choose today or a later date. |
| Closed Date cannot be before Opened Date | Choose a closed date after the opened date. |
| Issue Assignee does not belong to the selected Department | Choose a person from that department, or change the department. |
| You do not have permission to change the Issue Assignee of this Issue | Ask a user who has the right, or ask the person who reported the issue. |
| Resolved Issues cannot be edited. Please re-open the issue and then edit it. | Choose Re-open in the row menu first. |