


Purchase orders
Find, open, close, delete and send purchase orders. This is the list of all orders you place with suppliers.
- Where to find it
- Procurements > Purchase Orders
- Who can use it
- People who have the View Purchase Orders permission. Creating needs Add, editing needs Edit, approving needs Approve, deleting needs Delete.
A purchase order (PO) is the order you place with a supplier. It lists the materials, the quantities, the rates, the taxes and the delivery date that you agreed. After a PO is approved, the site can receive deliveries against it and the supplier can send bills for it.
For example, Acme orders 20 tonnes of steel bars for Acme Heights from Alder Steel Works at an agreed rate. That order is one purchase order.
This screen lists the purchase orders of the project you have selected.
How the buying flow works
- Site staff raise a material indent: a request for material.
- For a price comparison, you send a request for quotation (RFQ). Suppliers answer with quotations.
- You make the purchase order. There are three starting points: from approved indents, from the winning quotation, or from nothing. See Create a purchase order.
- An approver approves it. See Approve a purchase order.
- If the order changes later, you revise it. See Revise a purchase order and compare revisions.
- If the supplier delivers in parts, you set a delivery schedule.
Before you start
- Select the project in the project selector at the top of the screen.
- The supplier must be in the system.
- To create an order, you need the Add permission on Purchase Orders.
How to find a purchase order
- Open Procurements > Purchase Orders.
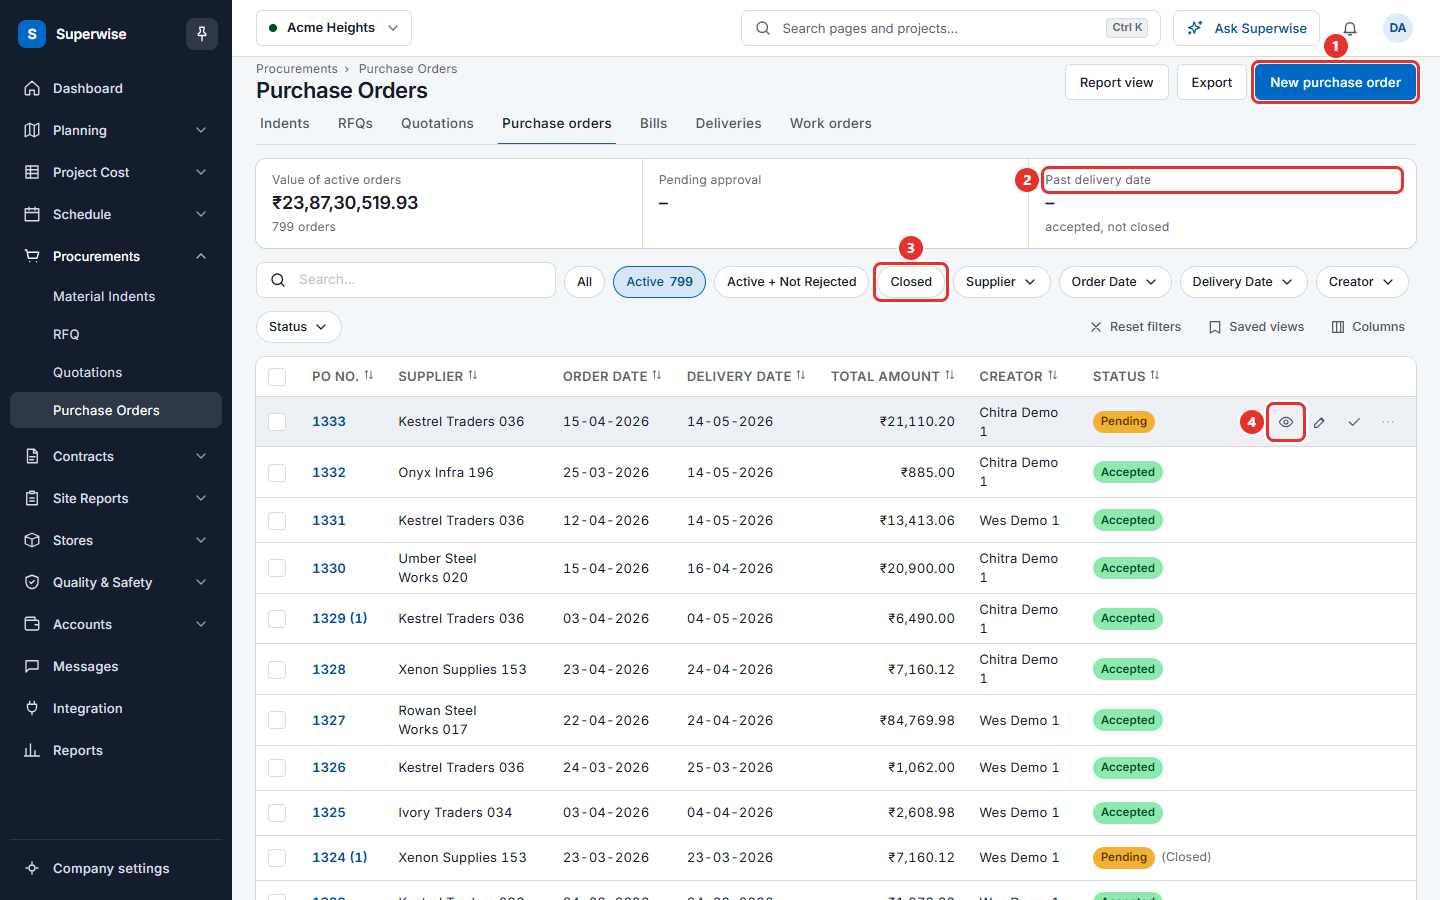
- Choose a filter above the table: All, Active, Active + Not Rejected or Closed (mark 3 in the picture).
- Use the Search... box, or the filter fields in the column headings, for example Supplier, Order Date, Delivery Date, Creator and Status.
- Click Reset filters to clear them.
The tiles above the table give a quick view. They show the value of the orders in the current filter, Pending approval, and Past delivery date (mark 2). Past delivery date counts orders that are accepted, not closed, and whose delivery date has passed.
How to open the details of an order
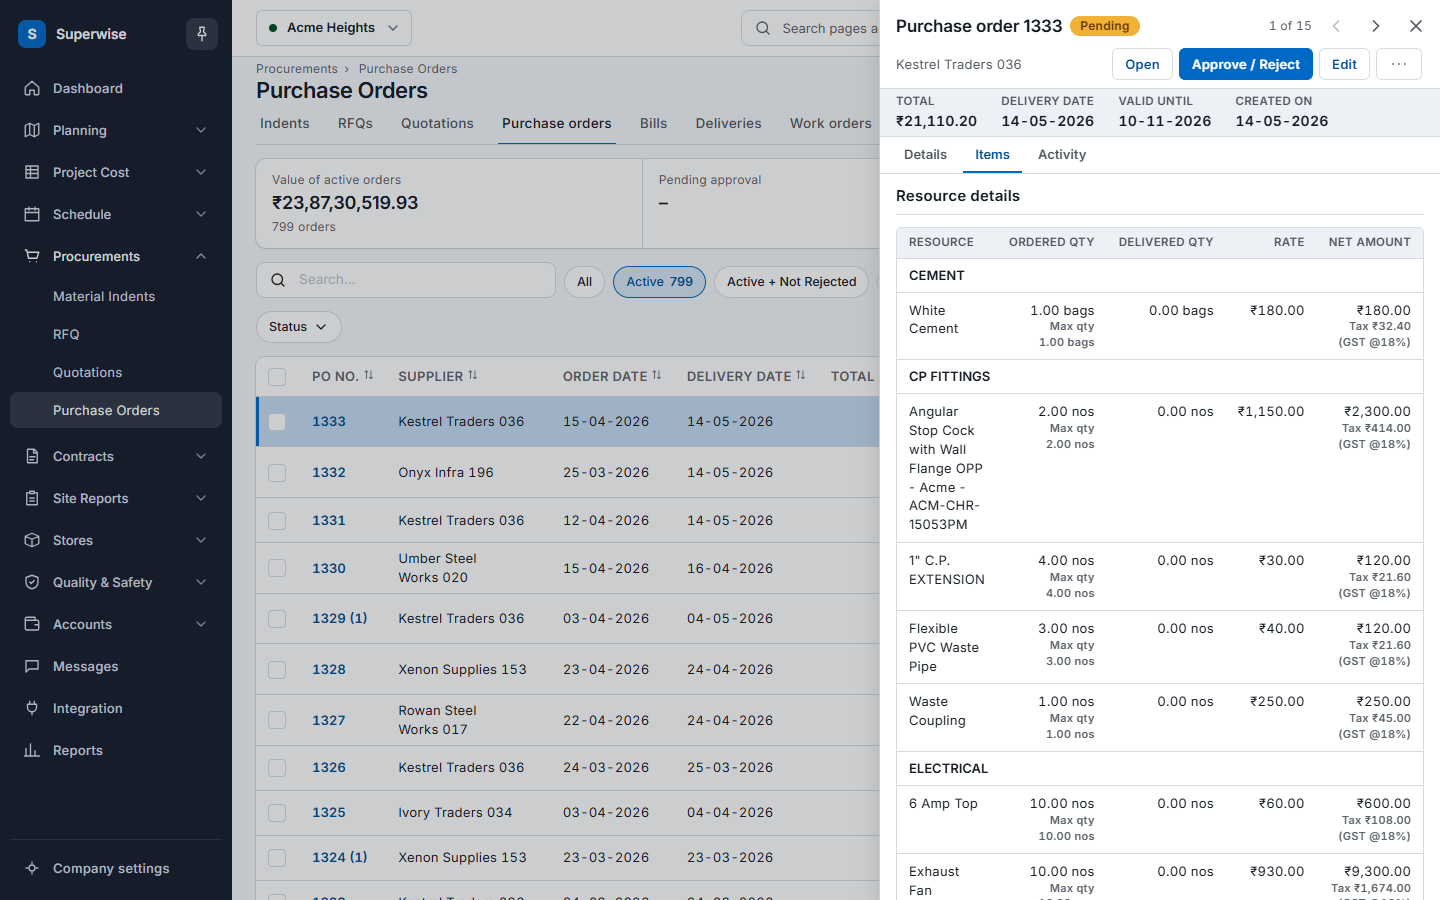
Click a row, or point at the row and click the Details icon (mark 4). The row icons show only when you point at the row. A panel opens. At the top it shows the number, the status, the supplier, the total, the delivery date, the valid-until date and the created date. It has three tabs: Details, Items and Activity. Items lists the materials with the ordered quantity, the delivered quantity, the rate and the net amount. The top has buttons for the actions you are allowed to do:
- Open: the full order, with all lines.
- Approve / Reject: shown if you are an approver of this order.
- Edit, Duplicate, Add MDS, Close PO and Delete.
The three-dot button holds the less used actions. Add MDS opens the delivery schedule of the order. See Material delivery schedule.
How to send, download or export an order
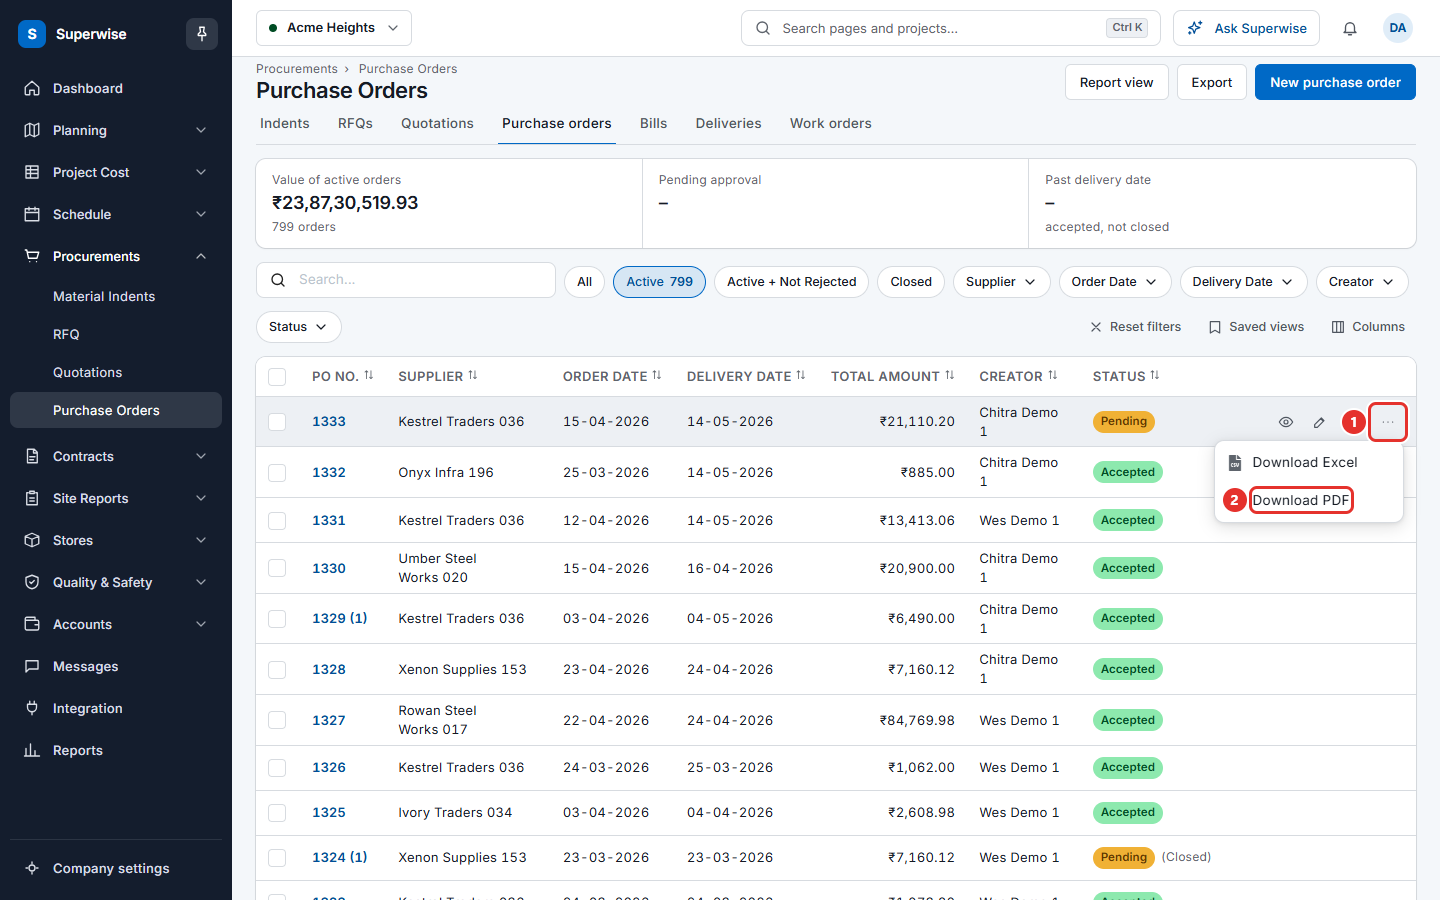
- Click the More icon (mark 1 in the picture below) in the Actions column. It is shown to approvers for an order that is Pending, Rejected or Accepted.
- Choose Email to send the order to the supplier. This is offered for an Accepted order.
- Choose Download Excel or Download PDF (mark 2) to save the order as a file.
To save the whole list as a file, click Export. To save only some orders, tick them and click Export selected. Report view shows a summary report instead of the list. Click View data to come back.
How to close an order
Closing tells the system that nothing more will be delivered on the order.
- Open the details of an Accepted order.
- Click Close PO.
- Click Confirm in the window Confirm Action.
The system refuses to close an order that has pending deliveries, rental receipts or labour challans. The message names which one: "Cannot close Purchase Order as it has Pending MDCs", "... Pending ERCs" or "... Pending Labour Challans". Approve or reject those first.
How to delete an order
- Open the details of the order and click Delete. It is offered for an order that is Pending, Rejected or Accepted.
- Click Confirm in the window Confirm Action.
The system refuses the delete in these cases:
| What you see | What to do |
|---|---|
| Purchase Order has deliverables recorded against it | Delete or reject the deliveries first. |
| Purchase Order has Bills created against it | Remove the bills first. |
| PO cannot be deleted because Tools in the PO have been received via transfer on site | The tools were received. Keep the order. |
What the columns mean
| Name | What it means |
|---|---|
| PO No. | The number of the order. A number in brackets is the revision. |
| Project | The project. Hidden by default. Show it with Columns. |
| Supplier | The company you ordered from. |
| Order Date | The date of the order. |
| Delivery Date | The date you expect the material. |
| Total Amount | The amount with tax. |
| Creator | The person who made the order. |
| Status | Where the order is. A note "(Draft)" or "(Closed)" can follow. |
| Actions | Icons for details, edit, approve or reject, compare revisions and more. |
Rules to know
| Status | What it means |
|---|---|
| Pending | The order waits for approval. A "(Draft)" note means it is saved but not sent for approval. |
| Rejected | An approver refused the order. You can edit it and send it again. |
| Accepted | The order is approved. Deliveries can be received. |
| Billed, Pay, Paid, PendingBill | Later steps of delivery, billing and payment. |
- The filter Active hides orders that are accepted and closed. Closed shows only those.
- The Edit icon is shown for an order that is Pending or Rejected, and for an Accepted order that is not closed.
- The Approve / Reject icon is shown only to an approver of this order. The order must not be a draft.
- The Compare revisions icon is shown when the order has a revision above 0.
- A material may still be on an active order of the same project. When you create a new order for it, the system closes the old line. It gives you the number of the old order first.
If something goes wrong
| What you see | What to do |
|---|---|
| No New purchase order button | You need the Add permission on Purchase Orders. |
| No Approve / Reject icon | The order is a draft, or you are not an approver of it. |
| No Close PO button | The order must be Accepted and not yet closed. |
| The list shows too few orders | Check the project selector, and choose All above the table. |
Related pages
- Create a purchase order
- Approve a purchase order
- Revise a purchase order and compare revisions
- Material delivery schedule
- Material indents
- Quotations
In this section
- Create a purchase orderMake a purchase order from nothing, from approved indents, from a winning quotation or from an old order. Fill the details, add the items and save.
- Approve a purchase orderCheck a pending purchase order, then approve or reject it. Approved orders can receive deliveries.
- Revise a purchase order and compare revisionsChange an approved purchase order, see what changed between revisions, and undo the last change while it waits for approval.
- Material delivery scheduleSplit the delivery of a material on a purchase order into dates and quantities, and follow how much arrived on each date.