


Roles
Create a role and choose what it can view, add, edit, delete and approve in each area. Use a view-only role for people who only read.
- Where to find it
- Company settings > General > Roles
- Who can use it
- People who have the View Roles permission. Creating needs Add and changing needs Edit. Deleting needs Delete.
A role is a set of permissions. You give a role to a user, and the user can then do what the role allows. For example, a Site Engineer role can add material receipts, and an Accountant role can approve bills. One user can have more than one role.
For every area of Superwise, a role has up to five permissions:
| Permission | What the user can do |
|---|---|
| View | Open the screens of the area and read the records. |
| Add | Create new records. |
| Edit | Change existing records. |
| Delete | Delete records. |
| Approve | Approve or reject records that wait for approval. |
Area means a part of Superwise, such as Projects, Purchase Orders or Work Orders. Each permission is a tick box. Without View, the user does not see the area.
Before you start
- Decide what each job in your company needs to do. Write it as a short list, for example "Storekeeper: add and edit material receipts, view purchase orders".
- Decide who reports to whom. A role can report to another role, for example Site Engineer reports to Project Manager.
How to create a role
- Open Company settings in the left menu, then General, then Roles.
- Click Add Role (mark 1 in the first picture).
- In Role Name (mark 1 in the second picture), type the name, for example Site Engineer.
- In Reports To (mark 2), choose the role this role reports to. This is optional.
- In the table, find each area the role needs. Tick the permissions in the columns View (mark 3), Add, Edit, Approve and Delete. Tick All (mark 4) to give all five.
- Scroll to the end of the table and click SAVE. A message says that the role was created.
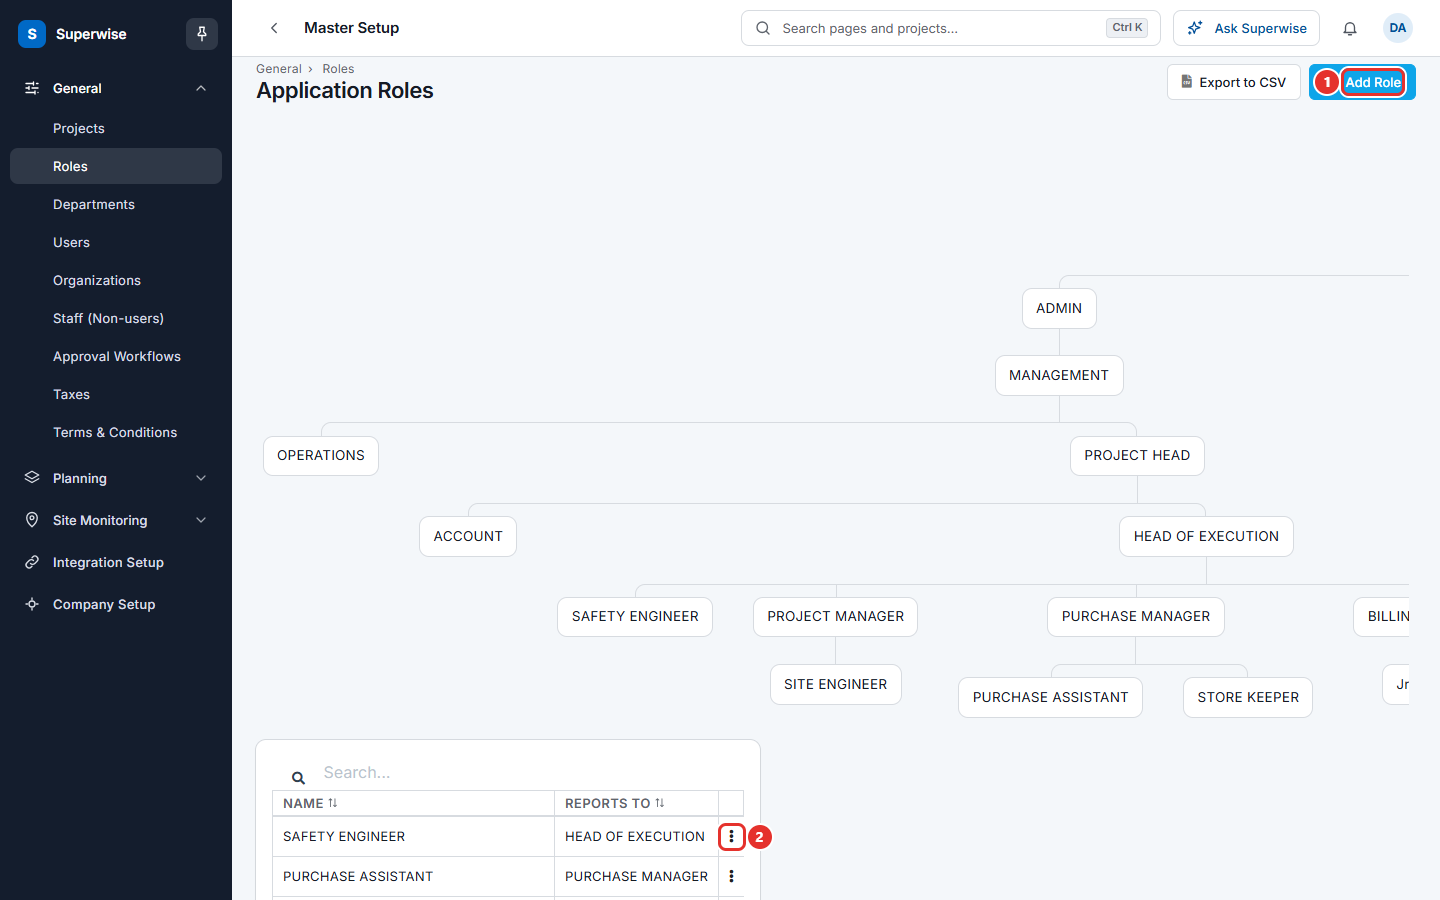
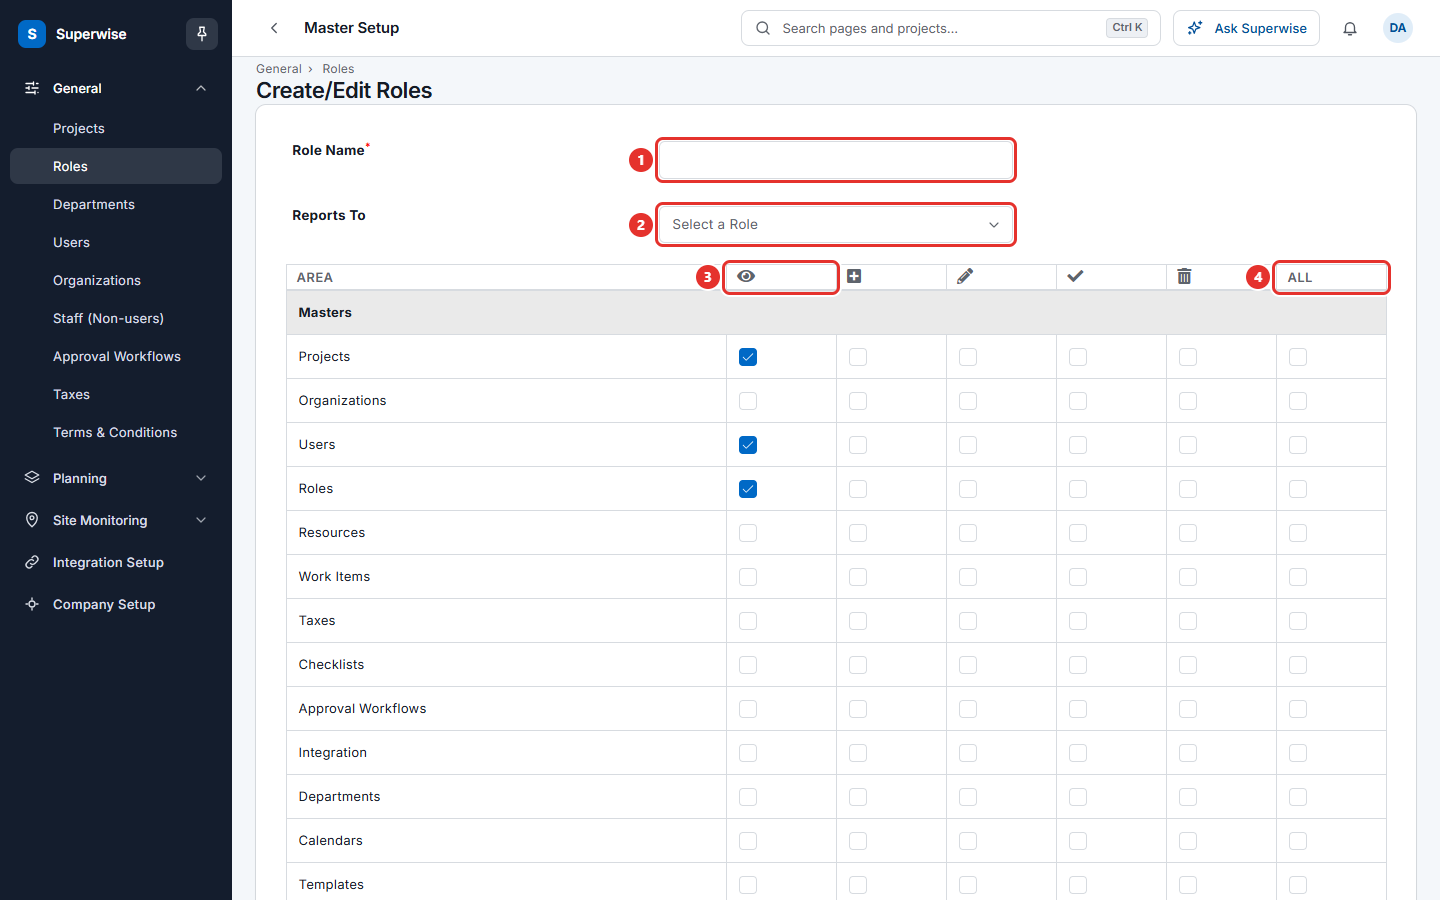
The columns of the table have icons. The eye is View. The plus is Add. The pencil is Edit. The tick is Approve. The bin is Delete.
How to make a view-only role
A view-only role can read but cannot change anything.
- Click Add Role and type a Role Name, for example Auditor.
- For each area the person needs to read, tick only View. Leave the other boxes empty.
- Click SAVE.
How to change a role
- In the list of roles, click the three dots at the end of the row (mark 2 in the first picture).
- Choose Edit.
- Change the name, the role it reports to, or the ticks. Click SAVE.
To see who has a role and what it allows, choose Details in the same menu. A side panel shows List of users in this role and Role Privileges.
How to delete a role
- In the list of roles, click the three dots at the end of the row.
- Choose Delete.
- Read the question and click Confirm.
The roles that report to the deleted role move up to its parent.
What the columns mean
| Name | What it means |
|---|---|
| Name | The name of the role. |
| Reports To | The role above this role. The chart above the list shows all roles as a tree. |
How the ticks work together
- View is the base. When you tick Add, Edit, Approve or Delete, Superwise also ticks View.
- When you tick Add, Superwise also ticks Edit, and the other way round.
- When you remove View, Superwise also clears the other four permissions of that area.
- The areas Projects, Users and Roles always keep View. Superwise shows a message if you try to remove it.
- Some areas need View of another area to work. When you tick View for such an area, Superwise ticks View of the other area too.
- When you remove View of an area that other areas need, a box Confirm Action lists the areas that may be affected. Click Remove All to continue or Cancel to keep it.
- All is ticked by Superwise when the area has all five permissions.
Rules to know
- A role name is required.
- A role cannot report to itself or to a role below it. The message is "Circular hierarchy in roles is not permitted. Please change the parent role".
- You cannot delete a role that is a step in an approval workflow. See Approval workflows.
- You cannot delete the only role that has access to a document folder.
- You cannot delete a role when a user has only that role. The message names the users. Give those users another role first. See Users.
If something goes wrong
| What you see | What to do |
|---|---|
| The Role Name field is required. | Type a name for the role. |
| Circular hierarchy in roles is not permitted. Please change the parent role | Choose another role in Reports To. |
| Role cannot be deleted as it is part of Approval Workflow | Remove the role from the workflow first, then delete it. |
| Role cannot be deleted as this is the only role present in Document Folder access. | Add another role to the folder, then delete this one. |
| User(s) ... will not be able to login | Give the named users another role, then delete this one. |
| Project View right is mandatory | Keep View ticked for Projects. The same applies to Users and Roles. |