


Material indents
Review the materials that site staff ask for, approve or reject each request, and start a purchase order from approved indents.
- Where to find it
- Procurements > Material Indents
- Who can use it
- People who have the View Material Indents permission. Approving needs Approve, changing a quantity needs Edit, deleting needs Delete. Placing an order also needs Add on Purchase Orders.
A material indent is a request for material from the site. For example, the site engineer at Acme Heights asks for 500 bags of cement that are needed by 15 March 2026. The indent is the first step of buying. The purchasing team reads it, approves it, and then buys the material.
This screen lists the indents of the project you have selected. You do not create an indent here. The screen has no button for it. Site staff raise indents in the Superwise mobile app.
How the buying flow works
- A site user raises a material indent: a request for material.
- You approve the indent. Its status becomes Accepted.
- You buy the material in one of two ways: - Ask suppliers for prices. Start with a request for quotation (RFQ). Suppliers answer with a quotation, and you choose one. - Order at once. Select the accepted indents and click Place Order. This opens a new purchase order (PO).
- The purchase order is the order you place with the supplier.
Before you start
- Select the project in the project selector at the top of the screen.
- An indent must exist. Site staff raise it in the mobile app.
- To approve, reject, edit or delete, you need the matching permission. If you do not have it, the icon is not shown.
How to approve or reject an indent
- Open Procurements > Material Indents.
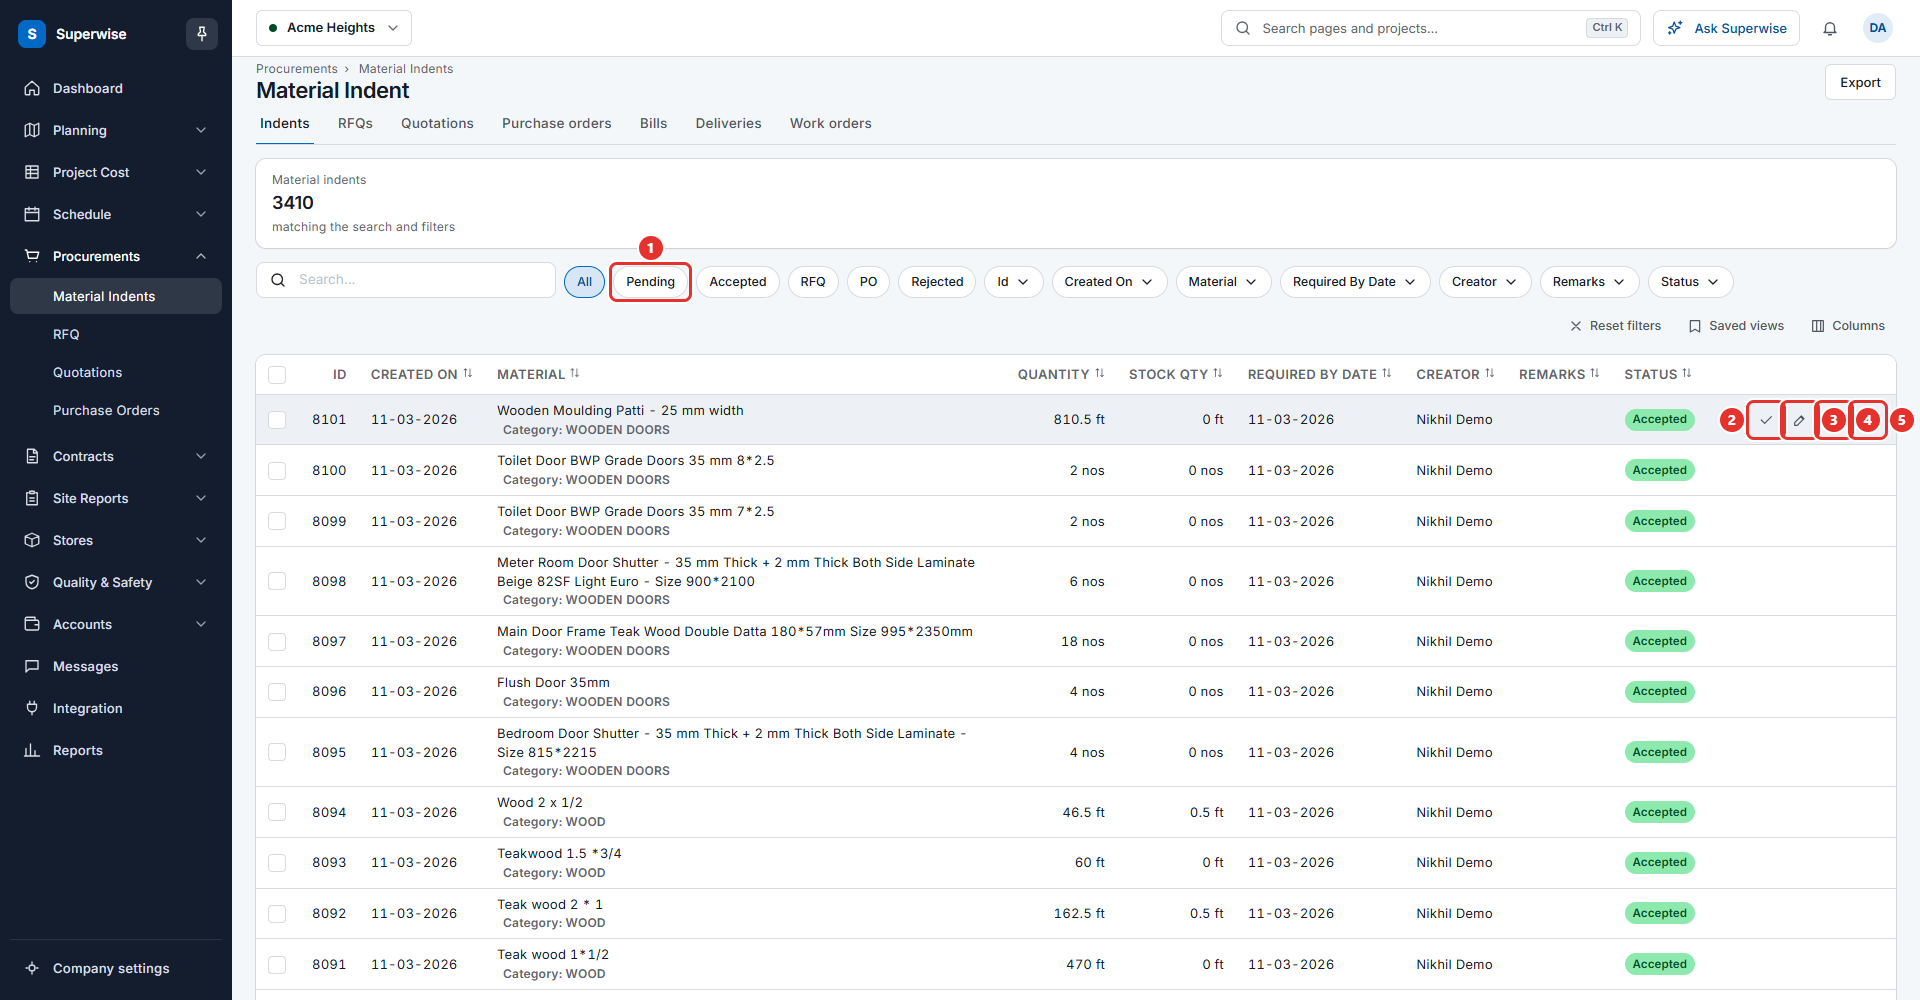
- Find the indent. To see only the indents that wait for a decision, click Pending (mark 1 in the picture of the list).
- Point at the row. Click the Approve / Reject icon (mark 2) in the Actions column. The row icons show only when you point at the row.
- Choose Approve or Reject in the small menu.
- The window Confirm Action asks you to confirm. Click Confirm.
You can also open the details of the indent and use the Approve or Reject button there.
Note: Approve is offered for an indent that is Pending or Rejected. Reject is offered for an indent that is Pending or Accepted. So you can change your mind.
When you reject an indent, the system also sends a notice about the rejection.
How to change the quantity of an indent
- Click the Edit Qty icon (mark 3 in the picture of the list). You can also use Edit quantity in the details of the indent.
- In the window Confirm Action, type the new quantity in the field marked 1.
- Click Confirm (mark 2).
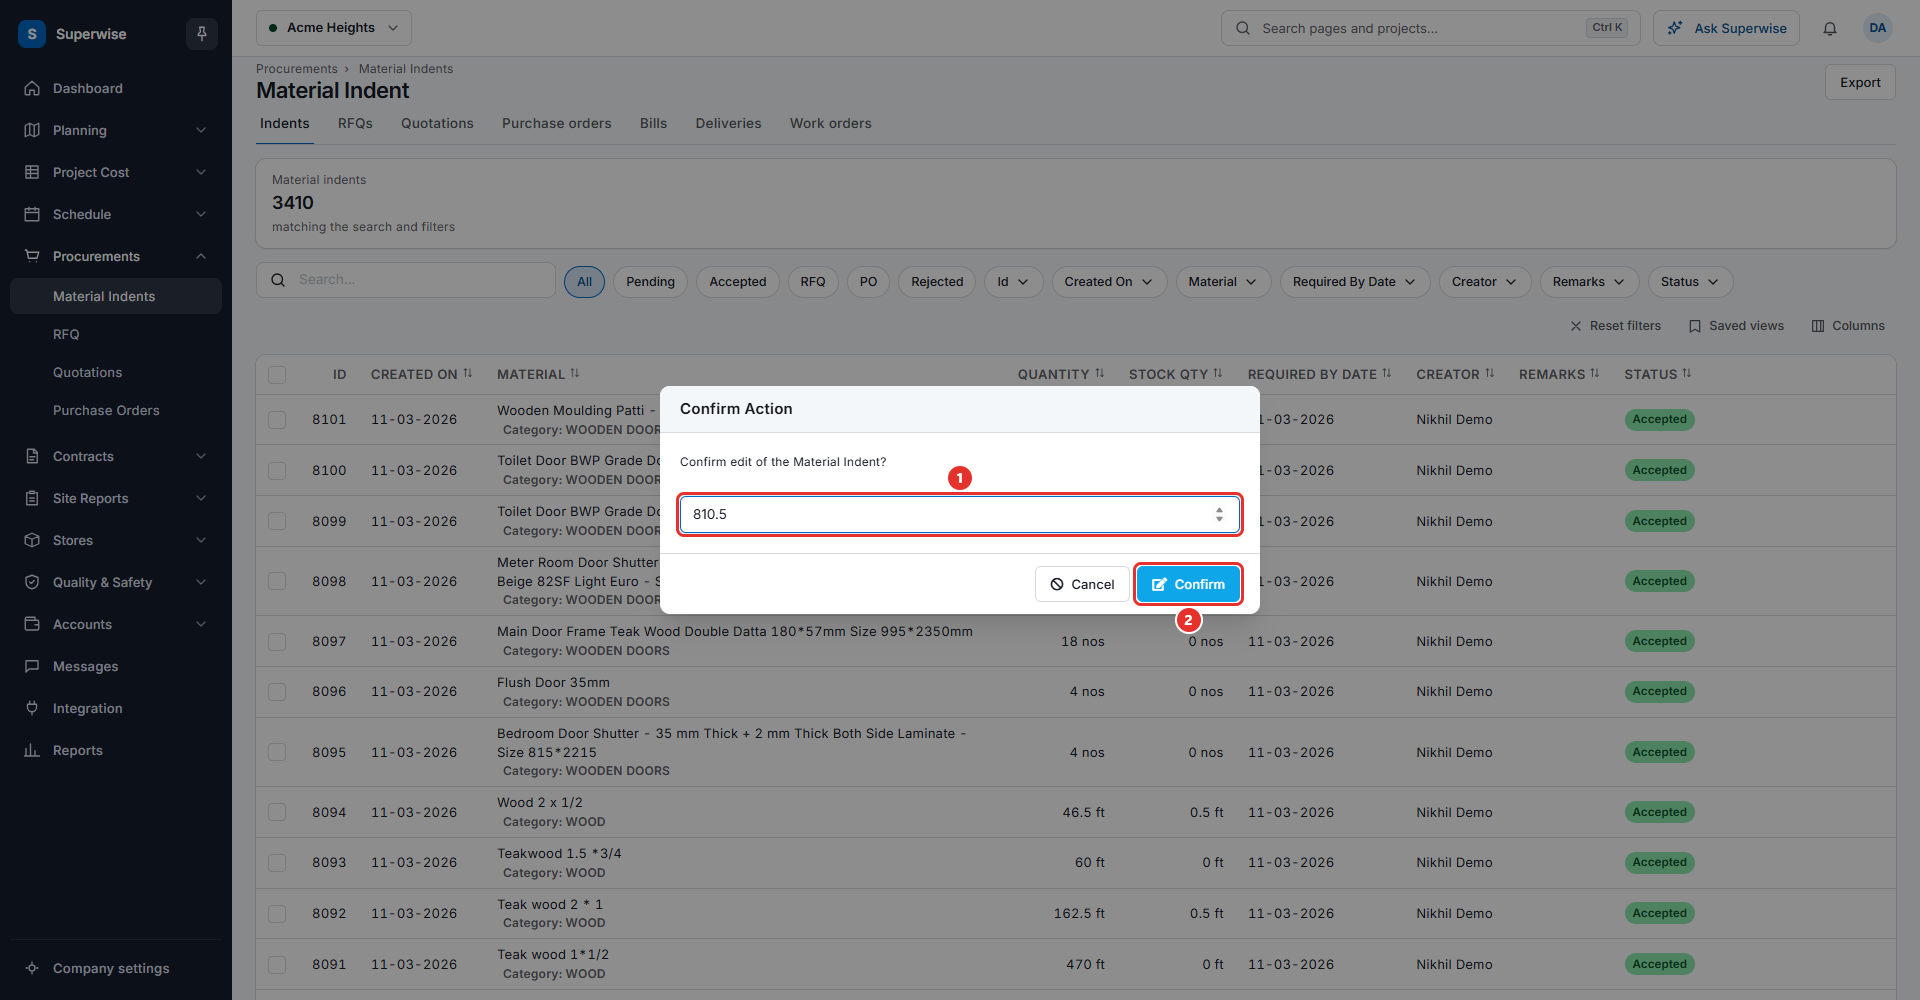
If the indent has lines from the bill of quantities (BOQ), the system does not use the number you type. It sets the quantity to the sum of the line quantities.
How to delete an indent
- Click the Delete icon (mark 4 in the picture of the list).
- Click Confirm in the window Confirm Action.
You cannot delete an indent that is linked to a purchase order. The screen shows the message "Indent cannot be deleted as it is linked to Purchase Order".
How to place an order from indents
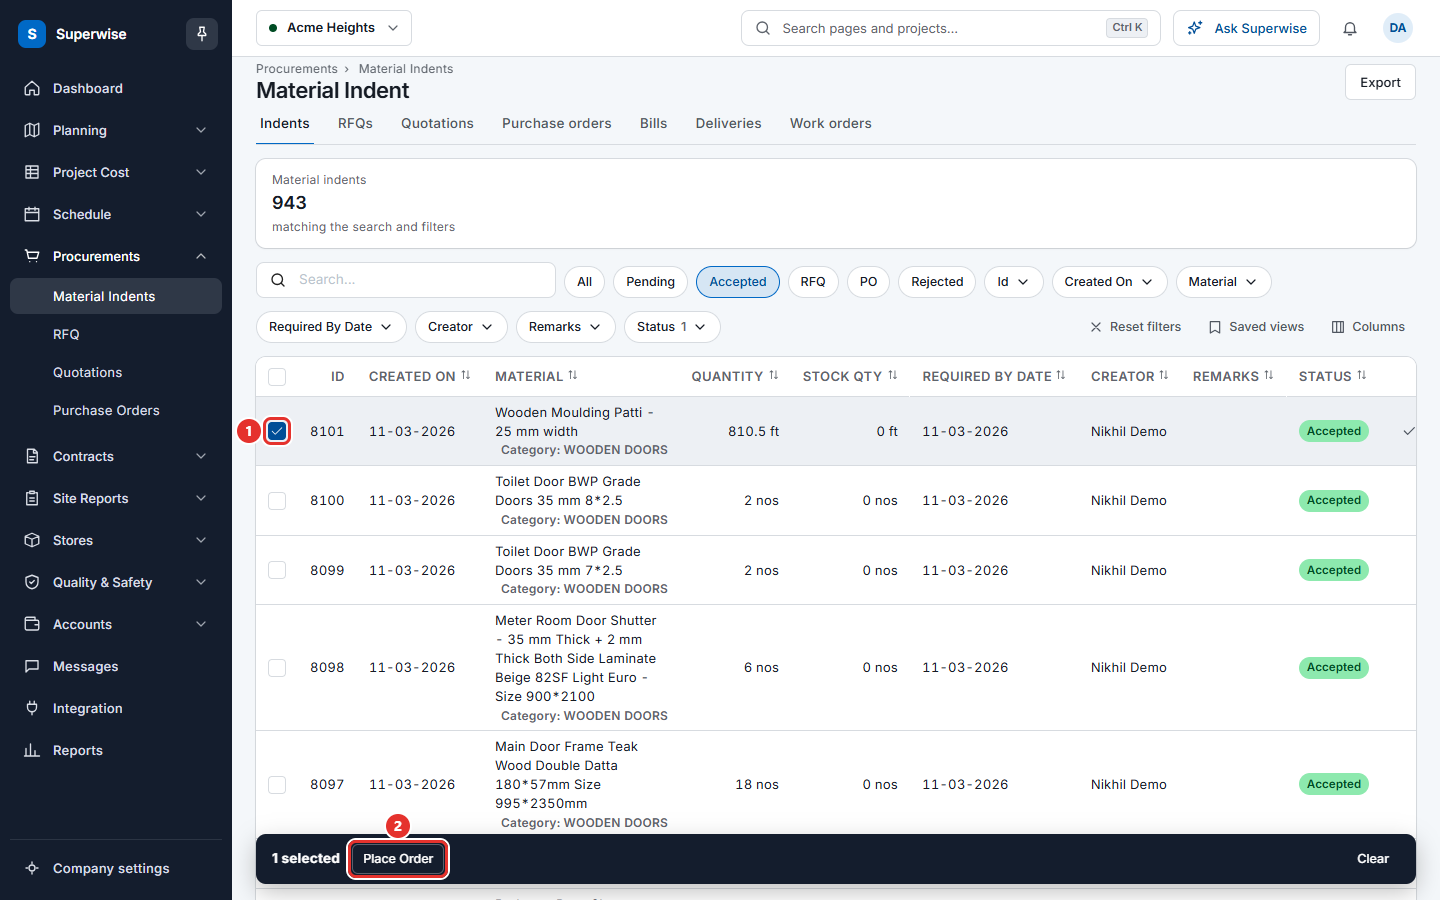
- Click Accepted above the table. Tick the check box of each indent you want to order (mark 1 in the picture below). Only indents with the status Accepted can be ticked.
- Click Place Order (mark 2). The button is in the bar that appears.
- If the system accepts the selection, it opens the new purchase order form in a new tab. The ticked indents are loaded into it. Continue as described in Create a purchase order.
The system refuses the selection in these cases:
| What you see | What to do |
|---|---|
| Please select all Material Indent from the same project | Tick indents of one project only. |
| Please select only Accepted Indents for Placing Order | Approve the indent first, or remove it from the selection. |
| PO has been already created on Selected Material Indent | An order with a delivery schedule already exists for these materials. See Material delivery schedule. |
If a material already has an open purchase order without a delivery schedule, the screen lists it with its PO number. You can edit that order to switch on delivery scheduling.
How to see the details of an indent
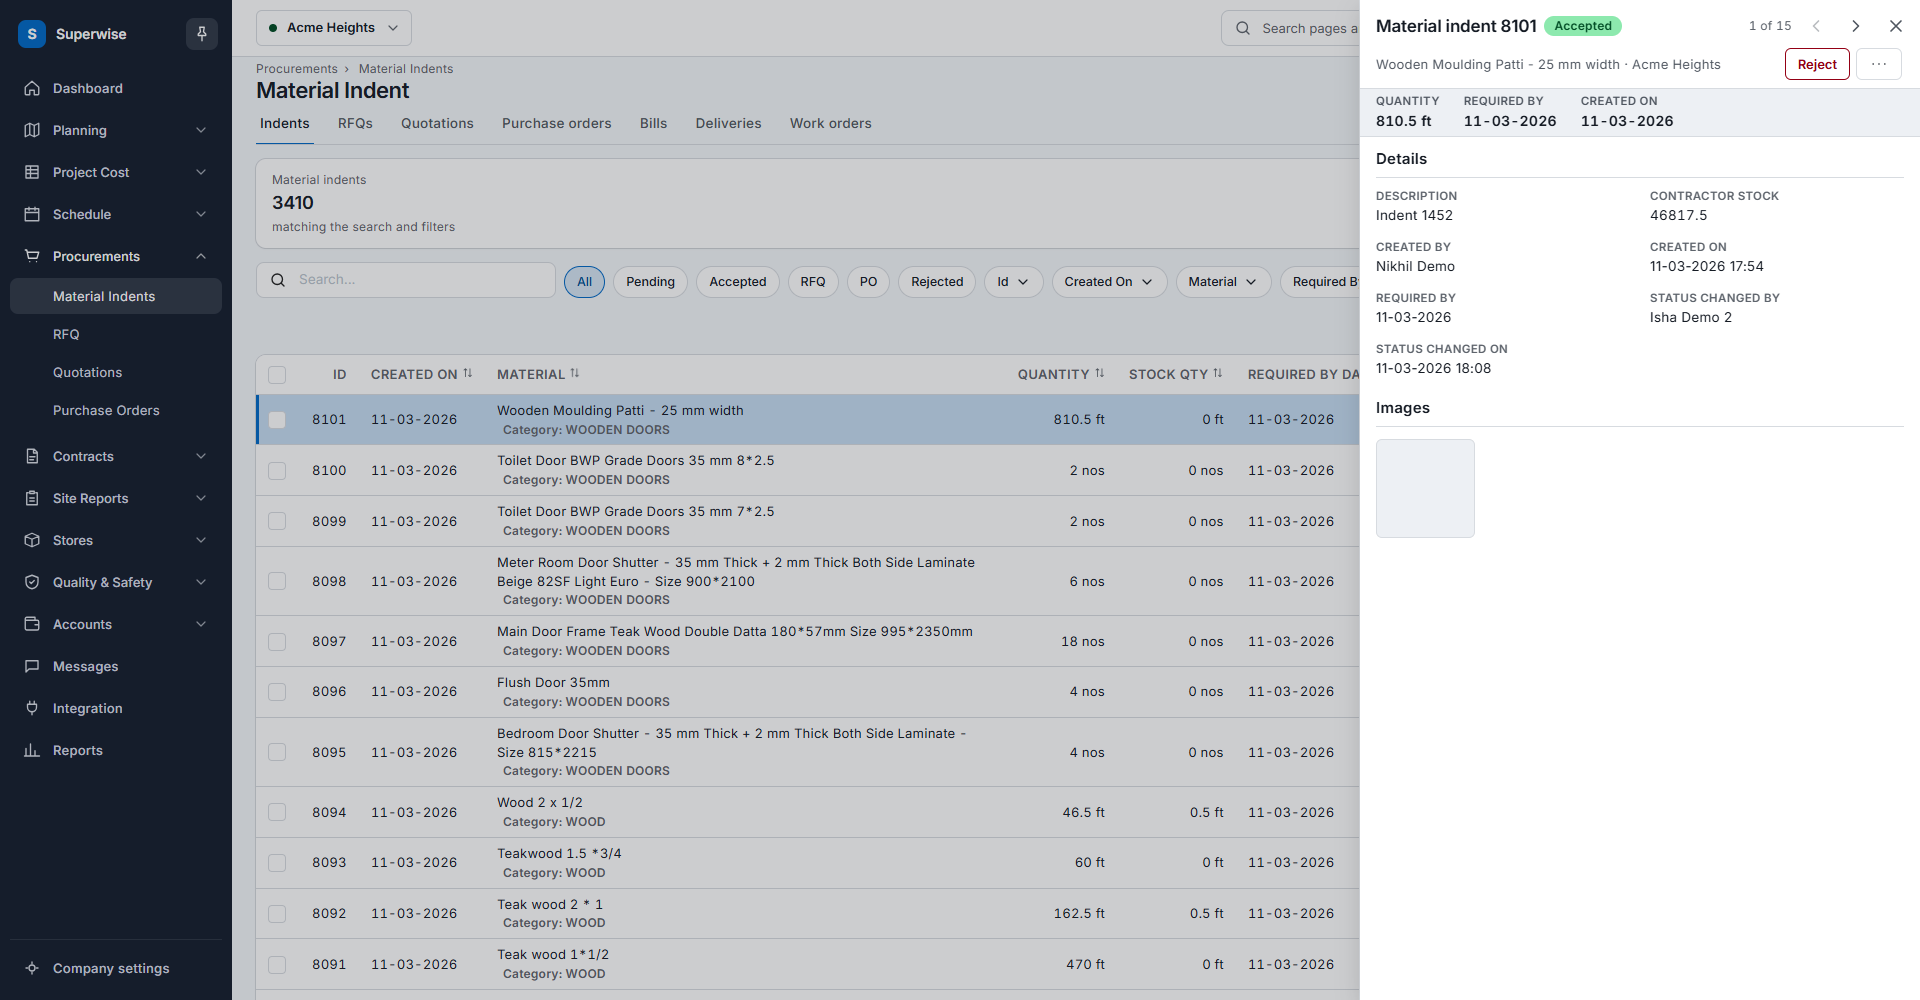
Click a row, or point at the row and click the Details icon (mark 5 in the picture of the list). A panel opens. At the top it shows the indent number, its status, the material and the project. It also shows the quantity, the required-by date and the created date. The buttons Approve and Reject are in the top bar when they apply. The three-dot button holds Edit quantity.
The panel has these parts:
- Details: description, contractor stock, who created it and when, who changed the status and when, and remarks.
- Items: one row for each BOQ line, with the columns BOQ, Area, Activity, Material estimated, Indent and Consumed. This part is shown only when the indent has BOQ lines.
- Images: photos sent with the indent.
- Comments: the discussion about the indent.
What the columns mean
| Name | What it means |
|---|---|
| ID | The number of the indent. |
| Created On | The date the indent was raised. |
| Material | The material that is asked for, with its category. |
| Quantity | How much is asked for, with the unit. |
| Stock Qty | How much of this material is in stock. |
| Required By Date | The date the material is needed on site. |
| Creator | The person who raised the indent. |
| Remarks | Notes written with the indent. |
| Status | Where the indent is in the flow. See the next section. |
| Actions | Icons to approve or reject, edit the quantity, delete, and see the details. |
The Export button saves the list as a file. The Project column is hidden by default. You can show it with Columns.
Rules to know
| Status | What it means |
|---|---|
| Pending | The indent waits for a decision. |
| Accepted | The indent is approved. You can place an order from it. |
| RFQ | The indent has gone into a request for quotation. |
| PO | A purchase order has been made for the indent. |
| Rejected | The indent is refused. |
- Only Accepted indents can be selected for Place Order.
- All selected indents must belong to one project.
- An indent that is linked to a purchase order cannot be deleted.
- Only people with the Approve permission see the Approve / Reject icon.
If something goes wrong
| What you see | What to do |
|---|---|
| No Approve / Reject icon | Ask your administrator for the Approve permission on Material Indents. |
| You cannot tick a row | The indent is not Accepted. Approve it first. |
| The list is empty | Check the project selector and click All above the table. |
| Indent cannot be deleted as it is linked to Purchase Order | Open the purchase order and remove the line, or keep the indent. |