


Templates
Build reusable task plans, group them in categories, and edit the copy that a project uses.
- Where to find it
- Company settings > Planning > Templates
- Who can use it
- People who have the View Templates permission. Adding a template needs Add. The task sheet needs Edit to open, Approve to change cells and Delete to remove rows.
A template is a ready-made plan for one type of work, for example Reinforced concrete slab or 1 BHK finishing work. It holds a list of tasks with durations and the order they follow each other. You build the template once. Later you add it to the schedule of any project.
Each template has a category, such as Finishing work, to keep the list tidy. Each template also has a duration unit: days or hours.
Before you start
- Create the packages you will use. See Packages.
- Create departments, and checklists if tasks need a check at start or finish.
- Set up the labour resources if tasks use them. See Resources.
How to add a template
- Open Company settings > Planning > Templates.
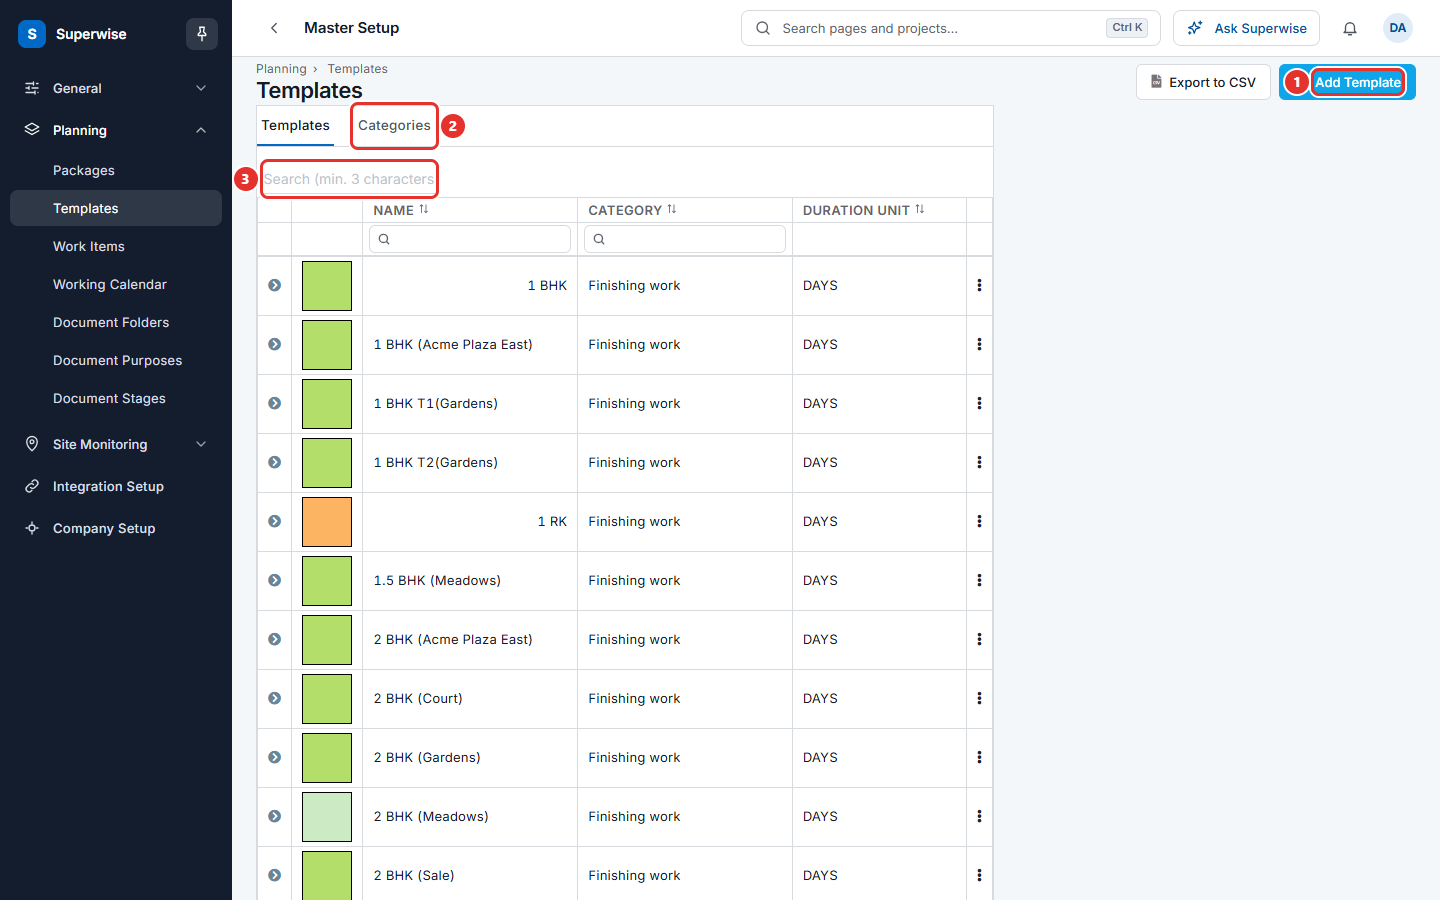
- Click Add Template (mark 1 in the first picture). A box opens.
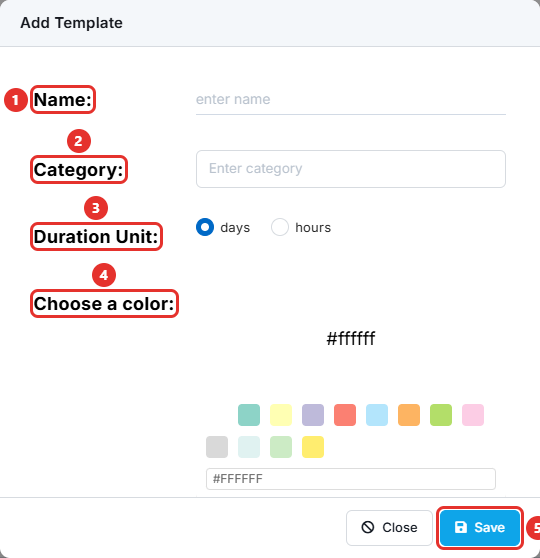
- Type the template name in Name: (mark 1 in the second picture). The name is required.
- In Category: (mark 2), start typing. Choose a category from the list. If you type a new name, Superwise creates that category.
- In Duration Unit: (mark 3), choose days or hours.
- In Choose a color: (mark 4), click a colour. The colour marks the template in the schedule.
- Click Save (mark 5).
A new template is empty. Add its tasks in the task sheet, as the next section shows.
How to copy, edit or delete a template
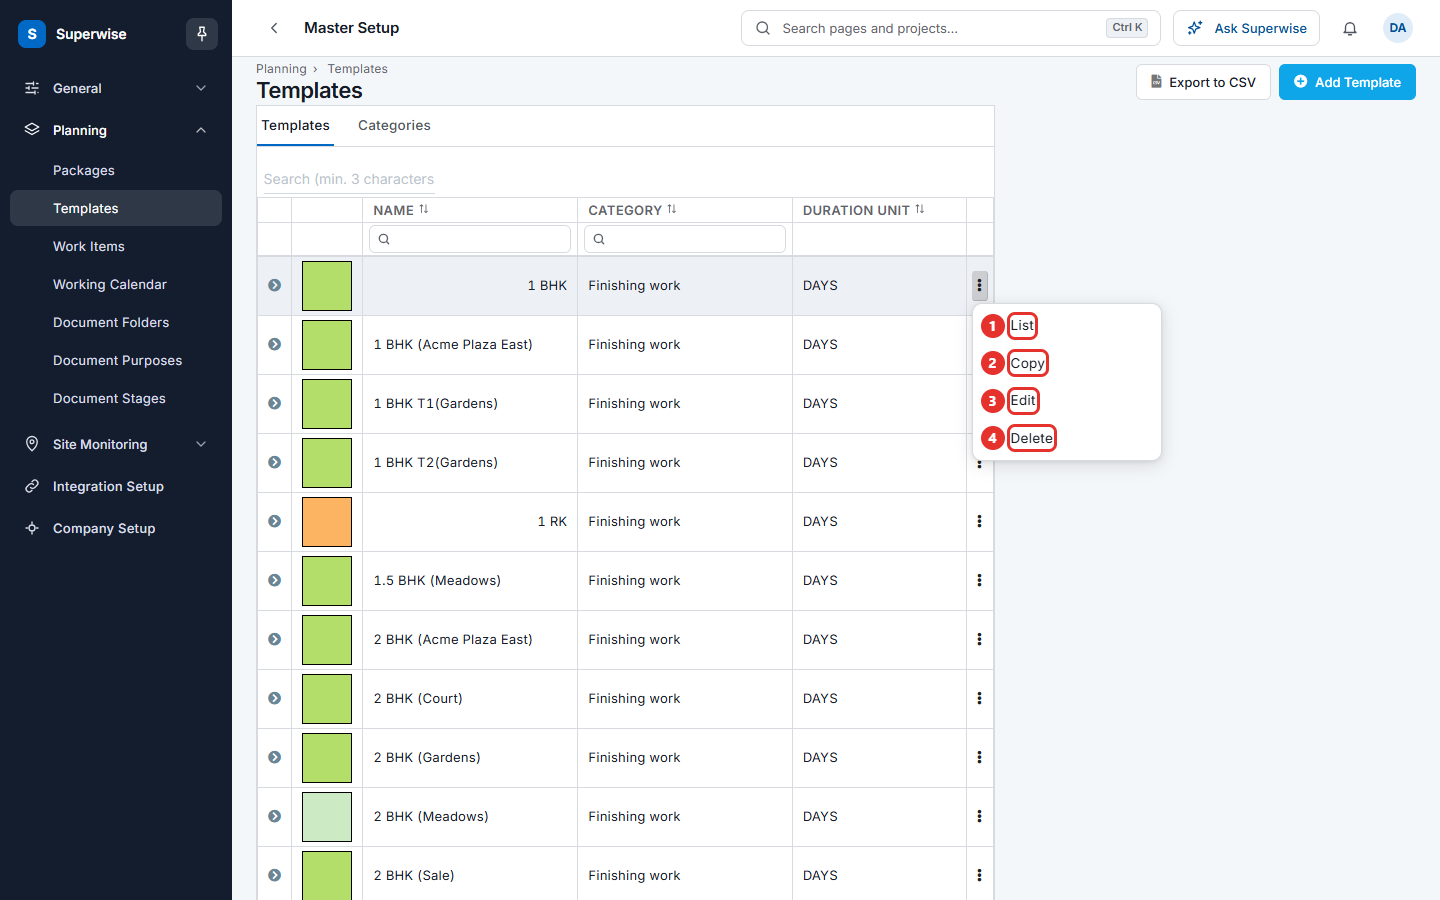
- Click the three dots at the end of the template row.
- Click List to open the task sheet of the template in a new tab.
- Click Copy to make a duplicate. Confirm the question Do you want to duplicate this Template ?.
- Click Edit to change the name, category, unit or colour.
- Click Delete to remove the template. Confirm the question.
Click the arrow at the start of a row to see the tasks of the template. Click Export to CSV to download the list. Type in the Search boxes under NAME and CATEGORY to filter.
How to fill the task sheet
The task sheet looks like a spreadsheet. Each row is a task or a group of tasks.
- Click List in the row menu of the template.
- Fill one row for each line of the plan. Use the right-click menu to add a row above or below, to cut, copy and paste, and to remove a row.
- In Code, give each row a number. A group row uses numbers such as
1or1.1. A task inside the group1.1uses the code1.1.x. - In Title, type the name of the row.
- In Task Type, choose one of the four types. Summary is a group heading. Task is real work. Milestone marks a key date. Dummy is a placeholder that holds no work. The first row cannot be a Task or a Milestone.
- In Duration (days), or Duration (hours) when the template uses hours, type a whole number above 0. Summary rows have no duration.
- In Predecessors, type the Id of the task that comes before. For example,
2means this task starts after task 2 finishes. Separate several tasks with commas. - Choose a Package, Department, Check (start) and Check (finish) from the lists. The lists show only items that already exist.
- Tick Enforce Checklist if the task must have its checklist filled before it can be finished.
- Click Edit Steps to split a task into steps. Click Edit Resources to list the labour a task needs. See the sections below.
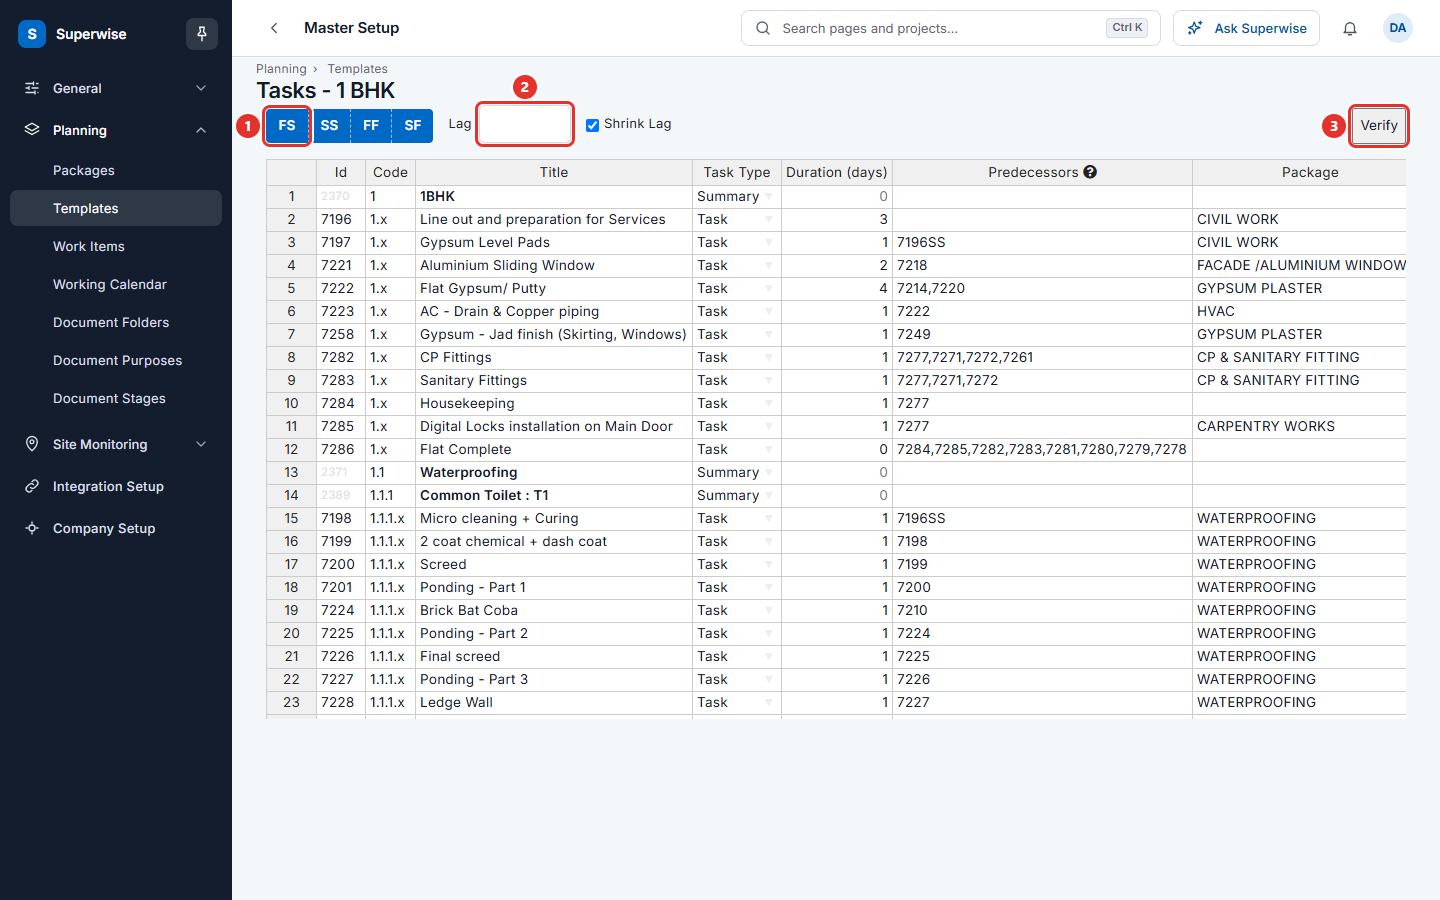
- Click Verify (mark 3 in the picture). Superwise checks all rows. Fix the red messages and click Re-Verify.
- When the check passes, a chart of the schedule shows. Click Save. Click Edit Mode to go back to the sheet instead.
How to write predecessors
Write the relation after the task number: 2FS, 2SS, 2FF or 2SF. FS means finish to start: the task starts when task 2 finishes. SS means start to start. FF means finish to finish. SF means start to finish. If you write only 2, Superwise uses FS.
Write a lag after the relation: 2FS+3d means 3 days after task 2 finishes. Use h for hours. A lag marked (S), such as 2FS+3d(S), can shrink.
You can also select two or more rows and click FS, SS, FF or SF (mark 1). The rows link in order. Type a number in Lag (mark 2) first to add a lag. Tick Shrink Lag to allow the lag to shrink.
How to add steps to a task
- In the Steps column of a Task row, click Edit Steps. The box Modify Steps opens.
- Fill Sequence (1, 2, 3 and so on), Title and Weightage for each step.
- Make the weightages add up to 100%.
- Click Update Steps.
How to add labour resources to a task
- In the Labour Resources column of a Task row, click Edit Resources. The box Modify Resources opens.
- Choose a Resource in each row. Resource ID fills in. Type the Hours.
- Click Update Resources.
How to import tasks from a file
An empty template shows Import File.
- Click Select file. Choose an .xlsx, .mpp or .xer file.
- Click Process and confirm Importing the file will replace existing rows.
- Check the rows that appear, then verify and save as usual.
How to manage template categories
Click the Categories tab on the Templates page.
- Click Add Category, type the name and click Save.
- Use the icons at the end of a row. The list icon, with the tip View templates, shows the templates of that category. The pencil edits the name. The bin deletes the category.
A category cannot repeat a name. You cannot delete a category that has templates. The message is Category has template linked to it.
How a project uses a template
When you add a template to a project schedule, the project gets its own copy. Changes you make to the copy do not change the master template. Open the copies from the Project Templates button in the schedule playground.
The page Templates - Acme Heights lists the templates of the project. A red message says when the schedule must be built again after you change a template.
- Click the arrow at the start of a row to see its Tasks and, when you can add one, its Variation tab.
- Click the list button (mark 1 in the picture below) to open the task sheet of the project copy.
- Click the branch button (mark 2) to add a variation. A variation is a changed version of the template for one project. Type a Variation Name and change only the values the sheet allows.
- In the task sheet of a project copy, click the round arrow button next to SF. Its tip says Re-Sync with Master. It pulls the latest changes of the master template into the copy.
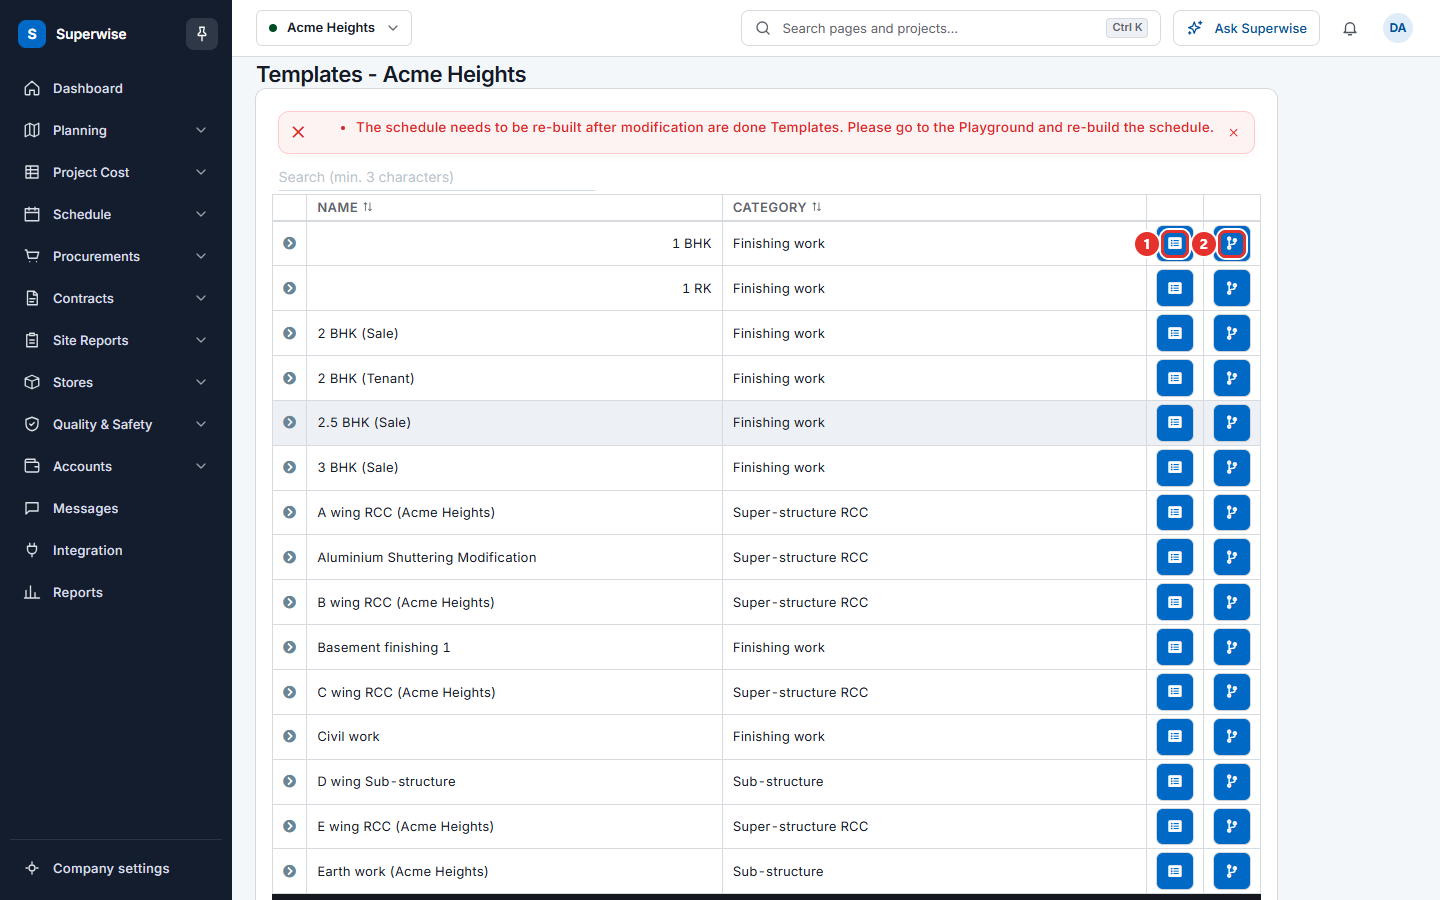
What the columns mean
| Name | What it means |
|---|---|
| NAME | The template name. |
| CATEGORY | The category of the template. |
| DURATION UNIT | Whether durations are in days or hours. |
| Id | The task number. Predecessors refer to it. |
| Code | The position of the row in the outline. |
| Predecessors | The tasks that come before this one. |
| Package | The work package of the task. |
| Check (start) and Check (finish) | The checklists to fill when the task starts and finishes. |
| Enforce Checklist | The task cannot finish before the checklist is filled. |
Rules to know
- A template name cannot repeat. The system shows Template Name cannot be repeated.
- You cannot delete a template that a project or a schedule playground node uses.
- The start and finish checklist of one task cannot be the same.
- A group row must have at least one row under it. A code cannot repeat.
- You cannot remove a task that a project already uses. The message starts with Task and names the project.
- Leaving the task sheet with unsaved changes asks you to confirm.
- Export from the chart works only when the sheet has no unsaved changes.
If something goes wrong
| What you see | What to do |
|---|---|
| Template Name cannot be repeated | Choose another name. |
| Template cannot be deleted as it is linked to one or more projects | Remove the template from the projects first. |
| Code ... has been repeated | Give each group a different code. |
| Task start and finish checklist cannot be same. | Choose different checklists, or clear one. |
| Task dependencies incorrect | Check the Predecessors of the rows named in the message. |
| Please correct the errors and update steps | Make the step weightages add up to 100% and fix the red cells. |
| Please upload .xlsx, .mpp or .xer files only | Choose a file of one of these types. |
Related pages
- Packages: the package list used in the task sheet.
- Work items: BOQ items that tasks can link to.
- Working calendars: the days the schedule counts.
- Planning masters: the order to set up the planning lists.